Showing posts with label cream cheese. Show all posts

Saturday, July 05, 2014

There Was Pie


You know what? There was pie.

There was a really amazeballs pie that is a cheesecake, and rhubarb, and baked all into one simple press-in-the-pan crust.

I first encountered this pie when a friend brought it to a lunch. I hadn't before experienced that sweetened sour cream topping and instantly was in love with the contrast of the tart rhubarb. Delicious. She shared the recipe, but without my own rhubarb supply, I didn't get around to making this extraordinary pie.

Fast-forward several years, and with the garden rhubarb well established, I am searching for ways to use it. I remember that delicious pie, but can't find where I stashed the recipe. Then, a Pinterest search brings me to my knees. There it is. Blogged by Brenda at A Farmgirl's Dabbles. The pie. The ultimate summer pie.

This summer, I have whipped this pie of perfection up for almost every cookout, and everyone loves it. Everyone begs for the recipe. But, I haven't blogged it because I haven't taken a photo. You see, we do a radical thing with the recipes that I make and share here On My Plate. We eat them. *gasp* Food photos happen when I am alone and have prepped something early (or have suitable leftovers). Otherwise, we are too busy eating to bother with taking pics.

Thankfully, there were a couple of pieces of Rhubarb Cheesecake Pie leftover today. They aren't perfectly sliced leftovers, and I snapped the pic with the camera on my phone, but who cares. There was pie.


(adapted from A Farmgirl's Dabbles)

1 1/4 cups flour
1/4 cups sugar
1/4 teaspoon salt
1/2 cup unsalted butter, at room temperature

2 1/2 cups rhubarb, chopped
1/2 cup of sugar
2 tablespoons flour

12 ounces cream cheese, at room temperature
1/2 cups sugar
2 large eggs
1 teaspoon vanilla extract

3/4 cup sour cream
2 tablespoons sugar
1/2 teaspoon vanilla extract

Preheat oven to 325F.
Using your mixer, combine flour, sugar, salt, and butter until crumbly.
Press the dough on the bottom and up the sides of a 9" pie pan.
Stir together the rhubarb, sugar, and flour.
Arrange evenly over the pie crust.
Bake for 15 minutes; set aside.
Increase oven temperature to 350F.
Again using your mixer, beat the cream cheese, sugar, eggs, and vanilla until light, fluffy, and creamy.
Pour cream cheese mixture over the hot rhubarb in the pie pan.
Bake for 25-30 minutes.
Stir together the sour cream, sugar, and vanilla.
After the cheesecake layer has baked for 25-30 minutes and mostly set, spread the sour cream layer over the center of the pie.
Leave about 1/2'' of the cream cheese layer exposed around the edges.
Bake an additional 15 minutes.
Let cool completely, then chill in the refrigerator for at least 2 hours before serving. Store refrigerated.

Wednesday, July 10, 2013

Tales from the Wildlife Refuge of My Backyard (part 1)

We may live in the middle of a small town, surrounded by other homes, an apartment building, a church, asphalt streets, and all the power lines and other accoutrements that we all believe we need for the city life, but I seem to have a wildlife refuge in my backyard. There aren't monkeys and lions and tigers and bears, but there might as well be.

The large, towering cottonwood had always housed one or more families of squirrels during our residence here. The bushy-tailed critters have stolen my strawberries, chattered at all of our pups, and basically been another part of our family. This past spring, I was surprised to see 7 (SEVEN!) baby squirrels running up and down the tree and jumping from branch to branch. That seems like a huge litter for one tiny mama squirrel, so I can only assume the our backyard tree housed a commune of squirrels. Those babies quickly caught Jenn's attention, and many days were spent with her holding point on the trees. She was extremely disappointed when they seemed to abandon our tree in early summer.

However, the hollow of the tree wasn't vacant for long. A swarm of bees buzzed in and started building a hive...just mere feet from my backdoor. I plan to blog soon about this experience, but needless to say, regardless of what the status is for honey bees in North America, I was extremely relieved when they moved on.

Shortly after the bee adventure, I was at the kitchen counter one evening starting dinner preparations when I glanced out the windows overlooking the backyard. There at the far back of the lots was a paint turtle creeping along the railroad ties lining the fence. It should be noted that it is a chain-link fence and it wouldn't exactly be easy for a turtle to gain access. We have tightened every spot that the girls could possibly stick their noses through in an attempt to rein in escape episodes. Still, that determined turtle thought our lush yard with green grass, gardens, flowers, and usually a sprinkler or soaker hose in action was the place to be. I let the girls play with her for awhile before turning her loose outside of the confines of our fence.

Fences have never been an issue for the garter snakes that call our backyard home. I suspect the old cistern and the nooks and crannies between the railroad tie borders for my planting beds are great habitat for them. Flourishing herbs and garden plants create abundant shade in the damp of the beds. Usually, there are multiples slithering around and eating the bugs, and we have an unspoken agreement. I leave them alone, and they do the same for me. Of course, I am startled when one glides away while I am picking strawberries, but at least they are moving away.  Until a week or so ago...

A week or so ago, I went out to pick strawberries and discovered that I had lost just as many half-eaten red berries to the birds as I was able to pick. In frustration, I quickly draped netting over the plants to help ward off the birds' advances. A day or so later, I leisurely strolled to the strawberry beds to check on the success of the netting only to find a garter snake had wound his way back and forth through the crumpled up net at the base of the bed. He was stuck much like those images of the birds and fish caught in the plastic 6-pack rings on the beach.

Snakes don't make me scream, but I wanted to. Knowing that Hubs was in the hay field and hours away from returning home, I watched anxiously for one of our manly neighbors to return and save me and the snake. It wasn't happening. I had to do it myself. I had to cut the snake out of the netting.

Garden shears in hand, I pulled the netting away from the plants and tried my best to keep the snake at full arms length away from me. At one point, I did have to touch him to pull some of the imbedded net out of his skin as I clipped. He also kept trying to slither back into the net as I released him. Finally, I found a way to keep his head buried in the strawberry plants as I pulled and clipped his way to freedom. I don't know if it was the "head in the sand" effect of him not being face to face with me or if it was me hissing, "Knock it off; I am trying to help you." that calmed him and made my job a little easier. Ultimately, he was free to slide into the recesses of the railroad ties and my netting had been clipped to the point that the birds had several points of easy access to the ripe strawberries.

I must have been in shock throughout this garter snake ordeal. I didn't take any pics. No before. No after. Certainly no during. My snap happy habit with my cell phone was totally forgotten. The only evidence of the trauma and drama is my clipped to pieces netting. You are probably glad. Nobody wants to see snake photos on a food blog. You are welcome.
  
We do like to see strawberry photos on a food blog, though, and I have a lot. I made this Strawberry Almond Tart on a gray day this spring with some of the first berries available at the market.

It was much easier than I anticipated, and I wish that I would have snapped some photos with the tart tin removed, as the crust was a gorgeous match for the crown of berries that topped the creamy, almond filling.

I am hoping for another strawberry harvest from the garden (snake-free, please) to make this again with my own berries. Strawberry Almond Tart is a deliciously civilized refuge from the wildlife that surrounds me.


(adapted from Cooking Light)

9 sheets honey graham crackers
2 tablespoons sugar
2 tablespoons butter, melted
4 teaspoons water
5 ounces cream cheese
1/4 cup sugar
1/2 teaspoon vanilla extract
1/4 teaspoon almond extract
6 cups strawberries, hulled (divided)
2/3 cup sugar
1 tablespoon corn starch
1 tablespoon fresh lemon juice
2 tablespoons sliced almonds, toasted

Preheat oven to 350F.
For crust, process graham crackers in a food processor until crumbly.
Add 2 tablespoons sugar, butter and water.
Pulse just until moist.
Press crust mixture into the bottom and up the sides of a greased 9-inch tart pan.
Bake for 10 minutes or until lightly browned.
Cool completely.
For filling, combine cream cheese, 1/4 cup sugar, and extracts until smooth.
Spread evenly over the cooled crust.
For topping, place 2 cups of strawberries in food processor and process until smooth.
Combine puree with 2/3 cup sugar and cornstarch in a saucepan over medium heat.
Bring to a boil, whisking constantly.
Reduce heat to low; cook 1 minute.
Remove from heat and cool to room temperature.
Toss the remaining 4 cups of strawberries with lemon juice to coat. 
Arrange berries over filling.
Spoon half of the glaze evenly over the berries. (Save remaining glaze for use over ice cream or in strawberry shakes.)
Sprinkle nuts around the edge of tart.
Chill 3 hours. (Serves 10)

Saturday, December 15, 2012

Double Dog Dare You

i double dog dare you

to do something unexpectedly kind

for someone else

maybe someone you don't even know

just do it

don't hesitate

do it today

do it tomorrow

do it always

be kind

our world needs more love

a lot more love


(Adapted from Bon Appetit)

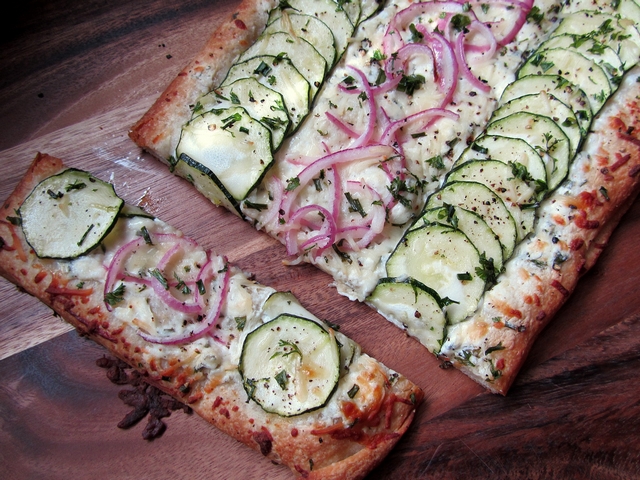
1 11-ounce tube refrigerated pizza dough
3/4 cup garlic and herb cream cheese spread (premade or make your own)
3/4 cup finely grated Parmesan cheese
3 tablespoons chopped fresh parsley
1 small red onion, sliced thinly
1 small zucchini, sliced thinly

Preheat oven to 400 degrees.
Line a baking sheet with parchment; spray with baking spray.
Unroll dough onto parchment.
Spread HALF of the cream cheese spread over HALF of the dough, leaving a half-inch border.
Sprinkle with HALF of the Parmesan and 2 tablespoons of the parsley.
Using the parchment as an aid, fold the plain half of the dough over the side spread with cheeses.
Spread remaining cream cheese on the top.
Arrange one row of zucchini down one long side of the dough.
Arrange one row of red onion slices beside the zucchini in the middle of the flatbread.
Arrange a final layer of zucchini on the other side of the onions.
Sprinkle with the remaining Parmesan and parsley; season with salt and pepper.
Bake about 24 minutes, until bread is puffed and golden brown on edges.
(Serves 4-6 as a meal or 12 or more as an appetizer.)

Tuesday, July 31, 2012

Glitter in the Air

This morning, I joined an auditorium of people in celebrating the life of a long time friend who last week lost her battle with cancer. I sat in that room with countless people sharing their memories and thoughts and heard one word echo endlessly.

Passion.

My friend, Diane, lived with passion. True. Complete. Total. Real. I-Don't-Give-A-Rat's-Behind-What-You-Think; This.Is.What.I. Know.Is.Real. Passion.

She gave herself fully to her family, her students, her interests, and her beliefs. She didn't hold back, and she encouraged each of us to do the same.

"Have you ever looked fear in the face and said,
'I just don't care.'?"


I was lucky enough to be able to spend some time with her and her family in the week before she passed. When I arrived at her home, I told her I was there to do her bidding. She simply asked me to cook. Late into the night when her steroids refused to let her mind calm, I crafted lists of menu items and she suggested the danish I had once prepared for a camping trip we shared with another high school friend. I quickly added the ingredients to my grocery list, and before my stay ended, I made three (!!!) batches of these easy, delicious Cream Cheese Danish for everyone to scarf down. I am glad my simple contribution made her happy. And now, I reflect on how even in her own last days, she nurtured me and my passion for cooking by giving me a platform to shine.

Passion.

Hers.

Mine.

Ours.

That was Diane.

She will be missed. Very much.


3 (10 ounce) cans crescent roll dough
1 (8 ounce) package cream cheese, softened
1/2 cup sugar
1 teaspoon lemon juice
3/4 teaspoon vanilla extract
1 teaspoon sour cream
1 cup powdered sugar
1 tablespoon milk
1 tablespoon butter, softened


Preheat oven to 350F.
Slice (unrolled) crescent roll dough into 1/4 inch slices (as if making slice-and-bake cookie dough)...I usually manage 12-16 slices per roll depending on my mood when cutting.
Place slices of dough on cookie sheet and make slight indention in the middle.
In a large bowl, cream together cream cheese, white sugar, lemon juice, vanilla extract and sour cream.
Add a tablespoon of filling to each roll.
Bake for 15 to 20 minutes.
In a small bowl, whisk together powdered sugar, milk, and butter.
Drizzle with icing. (36-48 danish...depending on slices)

Tuesday, July 10, 2012

Get the Good Stuff

Last Christmas, Hubs brought home a small, wooden cutting board from the area NAPA Auto Parts store. It was a token of appreciation for his business, and like all good promotional materials, the blonde wood board was imprinted with the business name on the handle. At the time, I joked that as sometimes readers of this blog, they were nudging for a shout out.

This cutting board was stowed away in the cupboard with all the other blocks of wood and polypropylene slabs that I use on a daily basis. It has been pulled out a few times for small tasks, but today, 6 months later, it is finally making its blog debut...whether this was the intention of the NAPA managers, or not.

It is pretty appropriate that NAPA's slogan is "Get the Good Stuff." Jalapeno Poppers are definitely the good stuff. One summer, I think that I made these for almost every get-together we attended...and a few that I didn't. Never ever did I come home with a leftover pepper. People love these creamy, cheesy bites of loaded jalapenos and smokey bacon. They can't get enough of the good stuff.


25-30 jalapeno peppers
1 8-ounce package cream cheese, softened
3 cups shredded cheddar cheese (We like to use the Mexican Blend.)
2 teaspoons Worcestershire sauce
6 slices of bacon, cooked and chopped

Preheat oven to 400F.
Slice jalapeno peppers in half and remove seeds.
Meanwhile, bring a large pot of water to a boil.
Blanch peppers in boiling water for 3-5 minutes.
Drain well and pat dry with paper toweling.
Combine cream cheese, cheddar cheese, and Worcestershire sauce until well blended.
Fill each pepper half with a teaspoon of cheese mixture.
Arrange filled peppers on a baking sheet lined with parchment paper (for ease in clean up).
Sprinkle bacon on top of each popper.
Bake for 5 minutes until cheese is melted. (Serves 25ish...2 pepper halves per person...as if anyone only eats 2)

Wednesday, May 09, 2012

Faith, Hope, Love

Last weekend, my 81-year-old father-in-law remarried. It was a simple ceremony joining him and a long-time family friend. Both had suddenly lost their spouses. Both clung to their faith, grasped hope, and found love, again.

With everyone caught up in smoothly merging the families in celebration, I did what I always do: I cooked. Kinda. I volunteered to handle the rehearsal dinner. The menu was simple and reflected my father-in-law's favorites, pizza and strawberry shortcake. This is where the "kinda" comes in...how do you make homemade pizza for a crowd in a church basement with only one oven? You don't. You order take-out.

I did make a couple of salads (tossed with a garlic vinaigrette and Classic Seven Layer) and the Strawberry Shortcake. My version of Strawberry Shortcake seldom includes real shortcakes. Sometimes, I use angel food cake, sometimes sponge cake, sometimes pound cake, sometimes just a delicious, vanilla sheetcake. With the task of feeding a crowd, I chose the sheetcake option for rehearsal night.

For the fruit topping, sometimes I simply macerate the berries with sugar, sometimes the strawberries are roasted, sometimes I make a fruit sauce with Danish Dessert. This leans toward June Cleaver discovering the benefits of packaged foods in the kitchen, but when prepared with lemon juice and a little cinnamon, I love the glossy, jellied sauce. (Although, please forgive the graininess of the sauce in the photos...they were taken with leftover sauce several days after our weekend of parties.)

And then there is the faith, hope, and love of my version of Strawberry Shortcake, the Creamy Cheesecake Whipped Topping. I whip cream cheese and powdered sugar together before folding into Cool Whip. (Yes, another convenience food. I love real whipped cream just as much as anyone, but you simply can't beat the stability of whipped topping when creating a dessert for a crowd.) This is the secret to my strawberry shortcake. This is my faith, hope, and love. Cream cheese.


2 (8 oz) packages cream cheese, softened
4-5 cups powdered sugar
1 (12 oz) container Cool Whip whipped topping, thawed


With a stand mixer, whip cream cheese.
Gradually add powdered sugar until fully incorporated.
Fold in the Cool Whip.
(Makes enough to "frost" a large sheetcake or dollop as for shortcakes.)

Saturday, February 18, 2012

Caught in the Act

Oreos have traditionally represented happy childhood memories. However, I can't look at an Oreo without thinking about my husband...naked.

I am sorry. I know you didn't come here for *those* kinds of tales, but trust me. This is legend.

As a farmer, Hubs usually finds himself as busy as a one-man-band. Chores are a never-ending battle, as are repairs. A leisurely day is treasured, almost held sacred. Back when we were mere newlyweds, one mid-summer Sunday morning began just as that type of day.

Always an early riser, my husband had showered long before my tired soul had dreamt of venturing from under the covers. What took place next is a bit foggy in our memories. The tale varies slightly with each re-counting; however, the facts remain the same. After showering, Hubs, for a reason not yet disclosed, proceeded to saunter through the house naked, without a stitch of clothing, modesty unheeded.

Feeling a need for nourishment, he selected not cereal, not eggs, not toast or even fruit, but Oreos. Then, he settled himself, still naked, in front of the TV.

Sometime later, I emerged from my slumber. Pulling on my robe, I stumbled groggily to the living room, just in time to see my husband's childhood pal pull into the drive. Announcing our guest's arrival, I noticed my husband's attire, or lack thereof.

Not fully awake, I instructed Hubs to remain in the chair. Meanwhile, Sam, the friend, had bounded from his car and was rapidly approaching the door. Hubs shot me a look which confirmed the insanity of my request and grabbed the Oreos. He dashed to the bedroom, leaving behind a tell-tale trail of Oreo cookies all the way down the hallway.

When questioned as to motive, Hubs simply stated it was freedom of expression. He can eat Oreos in the nude on any Sunday morning he wished. After all, it is a free country. *eye roll*

Zucchini Oatmeal Sandwich cookies are more like Little Debbie Oatmeal Creme Pies than Oreos, and you could eat them while sitting naked in your favorite chair watching TV, but you certainly don't have to. In fact, I even think I would prefer not to know if you do. OK? Unless it is a really great story of getting caught in the act...maybe.


(adapted from Martha Stewart)

3/4 cup unsalted butter, room temperature
1/2 cup sugar
1/2 cup packed brown sugar
1 egg
1/2 teaspoon vanilla extract
1 cup flour
1 1/4 teaspoon cinnamon
1/2 teaspoon baking soda
1/2 teaspoon baking powder
1/4 teaspoon salt
1 cup finely grated zucchini
1 cup old-fashioned oats
8 ounces cream cheese, room temperature
1 cup powdered sugar

Preheat oven to 350F.
Beat 1/2 cup of the butter (save remaining 1/4 cup for cream cheese filling) and sugars until pale and fluffy.
Beat in egg and vanilla.
Add flour, cinnamon, baking soda, baking powder, and salt.
Mix in grated zucchini and oats.
Refrigerate until firm, about an hour.
Using a medium cookie scoop (I might have used a small...I only have one.), drop dough onto parchment-lined baking sheets (I used Silpat and had problems with sticking. I think the parchment is essential.), spacing about 2 inches apart.
Bake until edges are golden, about 17 minutes.
Allow to cool on cookie sheet for a few minutes before placing on wire rack.
Cool on a wire rack. (The cookies are tender and crumbly when fresh from the oven. I let them cool on the rack overnight in order to dry out a bit and firm up for ease of spreading the filling.)
Beat together remaining 1/4 cup of butter, cream cheese, and powdered sugar until smooth.
Spread 1 heaping tablespoon filling onto the flat side of 1 cookie, and sandwich with another cookie.
Repeat with remaining cookies. 
Store loosely covered with waxed paper between layers of cookies. (Makes 2 dozen, approx.)

Saturday, February 11, 2012

A Dropped Ball Rolls - NYC, volume 2

The Broadway portion of our New York City trip was well planned. In fact, the trip was, in part, brought about by one friend's infatuation with Darren Criss and need (No, not want, desire, or wish. NEED.) to see him perform in How to Succeed in Business Without Really Trying. She put together a schedule for us to see three very different and extremely entertaining Broadway shows. In addition to How to Succeed, we also attended Wicked and Godspell during our brief visit. While I can't claim that I am as bitten by the Broadway bug as my friend, I do find myself (even weeks later) humming the tunes and know that if when I return to NYC, another show is a must. Witnessing that talent first hand is incredible. I recommend it to everyone. Really...even if you think you won't like it...the.shows.are.AWESOME.

As for the food portion of that New York City trip, I think I dropped the ball. No, I don't think, I KNOW I dropped the ball. I started out requesting info about various dining spots from others. They all promised to get back to me, and none did (and I didn't follow up as I should have). I started researching on my own. I became overwhelmed with the options, the desire to find perfect (for us) places, and the need to fit our nightly dining around the Broadway schedule. I became intimidated and dropped the ball. We went to New York without any definite food plans. Big fail on my part.

When we got there, we used Yelp, OpenTable, and the brochures/guides in our hotel room to locate options near to the theaters we would be visiting. We tried to search out places that were slightly different, but mostly we chose our destinations based on convenience to the theater.

Of course, sushi had to be one night's dinner. Of.course. I was really looking forward to experiencing sushi somewhere other than the Midwest. We are very fortunate to have several good sushi options available in our larger South Dakota cities. I enjoy them very much every time I visit, but something told me I had to find the "real deal" in the Big Apple. I shouldn't have listened, or I should have looked harder. I am afraid our sushi choice was sadly disappointing for me.

On first entering, the atmosphere was promising. The twinkling white lights of the birch branches outlining the restaurant seemed enchanting. Energy was high and while our reservation was early, the place filled up quickly. Our sashimi orders were good...but other than having bad fish, how do you mess up sashimi? The rolls were where the meal became lackluster for me. The rice was dry and (to my palate) underseasoned. Rolling also left something to be desired, as even my more practiced chopsticked hands had trouble holding the loose and sloppy pieces together. Overall, it was a meal. It was OK, but not great. If it were my first sushi experience, I wouldn't go back (and with all the other sushi eateries in NYC, when I do go back, it won't be back to that one). I honestly left that restaurant hoping that when we flew back to South Dakota, we would have time to stop for sushi in our big city before heading back to the prairie.

Now, I know that many of my local readers are cringing. "Sushi?" they say. "Yuck." That's OK. I am a firm believer that we don't all have to like the same things, and if you don't like sushi, there is more (of the good stuff) for me. *grin* I also have a very tame treat for you, Cowboy Sushi. (And for those of you that DO love sushi, this snack or appetizer is just a fun little departure from the usual.)

I have made these cream cheese and beef wrapped pickles for almost 20 years. The friend who originally shared the recipe called them Monkey Pods. Some call them Pickle Wraps, or just Those Pickle Things. I saw a blog calling them Cowboy Sushi and since I do dearly love all things sushi, decided that should be the name for me.

There are variations of these made with deli ham and with dried beef, but there is something about the seasoning of the processed slices of Buddig Beef that (I think) really complements that pickle and cream cheese. (Don't send me hate mail about that deli meat choice, please.) These couldn't be further from real sushi, but I don't care. I like both a good Dragon Roll and Cowboy Sushi On My Plate.


(with naming rights going out to The Good Wife)

1 jar of dill pickles (whole)
cream cheese, softened
2-3 packages Buddig Beef (or dried/chipped beef or deli ham)

Remove several pickles from the jar and pat dry with paper toweling.
Arrange a slice of deli meat on a cutting board (also pat dry, if damp).
Carefully (really...it tears pretty easily), spread softened cream cheese over the slice of deli meat.
Place a whole pickle on one side of the cream cheese topped deli meat and carefully roll the meat around the pickle.
Refrigerate until firm (about an hour).
Slice in 1/2 to 1-inch thick portions.
Serve as an appetizer or snack.

Thursday, April 07, 2011

Heaven

Those are chives. In my garden. Peeking up through the soil and screaming that IT. IS. FINALLY. SPRING

Finding those little green sprouts in my garden is heaven for me. I am so happy that I could...I don't know...sing? dance? pee my pants? Probably. How about if I just show my heavenly happiness by whipping up some of my most favoritest eggs in the whole world? This is a food/recipe/cooking blog, after all.

I love, love, love a good poached egg. Runny yolk is king, but The Original Pancake House (not IHOP; never IHOP; their pancakes are crumbly) won me over with a simple scrambled egg that I now crave. It isn't always on the menu, but sometimes, if you ask the staff nicely (and they have the cream cheese on hand...yes, CREAM CHEESE; doesn't that sound great?), you can still order them. And now, thanks to me sharing my extreme happiness, you won't have to wait until you are at The Original Pancake House and on your best behavior to get some Heavenly Scrambled Eggs. 


(inspired by eggs eaten at The Original Pancake House and adapted from Alton Brown's Scrambled Egg technique)

2 eggs
1-2 tablespoons heavy cream (whole milk or half & half will work, but I prefer the cream)
kosher salt
fresh ground black pepper
1 tablespoon butter (optional...I DON'T use it with a non-stick pan)
1-2 ounces of cream cheese, cut into 1cm cubes
freshly snipped chives


In a small mixing bowl, combine eggs and cream with a fork or whisk.
In a non-stick skillet, melt the butter over medium-low heat until it bubbles OR just heat the non-stick skillet to medium-low without the butter...I seriously never use butter unless the pan isn't non-stick.
You NEED the pan to be hot before you add the eggs.
Add a little salt to the egg mixture, then pour into pan, stirring slowly with a heat resistant rubber spatula.
As soon as curds begin to form, add the cream cheese cubes and sprinkle in the chives.
Increase heat to high and instead of stirring, use the spatula to fold the eggs over themselves.
As soon as the cream cheese begins to melt (it won't all melt...there will be pockets of tangy, creamy goodness) and the eggs aren't liquidy, remove from the heat and serve.
Season with fresh black pepper and garnish with additional fresh chives, if desired.
I do recommend that you heed Alton's warning: "Remember: if they look done in the pan, they'll be over-done on the plate." (Serves 1...or 2, if you are better at sharing than I am)

Thursday, December 02, 2010

Gooey. Pumpkin. Butter. Cake.

Gooey.
Pumpkin.
Butter Cake.

Need I say more?

(adapted from The FoodNetwork)

1 package yellow cake mix
1 egg
8 tablespoons butter, melted
1 (8 ounce) package cream cheese, softened
1 (15 ounce) can pumpkin (NOT pie filling)
3 eggs
1 teaspoon vanilla
8 tablespoons butter, melted
2 cups powdered sugar
1 teaspoon cinnamon
1 teaspoon nutmeg

Preheat oven to 350 degrees.
Combine the cake mix, 1 egg, and 8 tablespoons butter with an electric mixer. 
Pat the mixture into the bottom of a lightly greased 10 or 12-inch spring-form pan. 
To make the filling: In a large bowl, beat the cream cheese and pumpkin until smooth.
Add the remaining eggs, vanilla, and remaining butter, and beat together. 
Add the powdered sugar, cinnamon, nutmeg, and mix well. 
Spread pumpkin mixture over cake batter and bake for 50-55 minutes. (I place the spring-form pan on a sheet pan just in case of leakage.)
Make sure not to overbake as the center should be, of course, gooey. (It is a Gooey Pumpkin Butter Cake, right?) 
Serve with whipped cream (fresh is best). (Serves 8-12)

Tuesday, August 11, 2009

Taming the Monsters

July came and went very quickly for me. I was busy...busy taming monsters. Every Monday through Thursday of the last month, I spent my morning attempting to help a small class of junior high students in Summer School.

Starting at 8am.

Studying Algebra.

Did you all cringe? Did you all have flashbacks to equations that wouldn't solve for "X" and graphs that didn't form straight lines? Did you all think of the moody hormones of your own Jr Hi-aged kids and thank the dear Lord above that you have never been shut in a small room with them and a math book for 4 hours every morning?

I thank you for you sympathies, but it wasn't the students that weren't monsters. My class was actually pleasant, courteous, engaging, and even brought snacks to share. We got along great. The monsters that I attempted to tame were the "I don't want to," "This is too hard," "Why do I need to know this?" monsters. Just the word Algebra puts up roadblocks for so many students. It was my task to find the paths of understanding for this little group. We took detours with cupcakes topped with sprinkles and frosted brownies, but I think by the end of our session, we also found our way to grasping a few math skills and learning that Algebra isn't a monster. I hope.

While my mind was balancing math equations, my garden finally started to take off. After rain and cool temperatures seemed to stunt my seedlings growth, sun and heat unleashed monsters. Plants doubled and tripled in size. Blossoms formed fruit on the sturdy plants and the vegetable flourished. Gardening required daily attention, and sometimes I didn't make it out to my small garden spot as often as I should have. That is when the monster zucchini hit. One day, they can be perfectly tender, little green fruits. The next day, they are HUGELY obscene monsters that seem to be growing and growing and growing taking over the world. Zucchini is a monster that demands taming.

A monster zucchini isn't as sweet or tender as the more delicate, smaller ones. The skin is tough, the core has developed seeds, and the flesh is dryer. It is best suited to shredding, and with a food processor or even a box grater, it doesn't take much effort to tame this monster. Shredded zucchini makes great pancakes, can be added to quiches, frittatas, and casseroles, and of course, there is my favorite use, desserts. One of my personal favorites for taming monster zucchini is Spiced Zucchini Bars with Cream Cheese Frosting. I will gladly wrestle down a summer monster for these to land On My Plate.


4 eggs
2 cups sugar
3/4 cup oil (I usually use Canola oil in baking, but had luck with olive oil in this recipe.)
2 cups flour
2 teaspoons baking soda
2 teaspoons cinnamon
1/2 teaspoon ground cloves
1/2 teaspoon ground nutmeg
3/4 cup chopped walnuts (optional)
2-3 cups grated zucchini

Preheat oven to 350 degrees.
Combine eggs and sugar in using mixer.
Beat in oil until creamy.

Add dry ingredients and beat well.

Stir in grated zucchini until well blended.

Pour into a greased and floured 10 x 15 pan.

Bake for 30 minutes, or until pick inserted in center comes out clean.


For frosting:
3 tablespoons softened butter
2 8 oz. packages cream cheese, softened
1 1/2 cup powdered sugar
2 tsp. vanilla

Beat frosting ingredients together until creamy.
Spread on COOLED bars.

Friday, March 27, 2009

Strawberry Whine

Fresh spring strawberries are surfacing in every grocery store. Ripe, plump, juicy, red sweetness. What is there to whine about? How about whining about the fact that with fresh strawberries, I can eat an entire baguette in one sitting? all by myself? without even thinking about it? Spread a little (or a lot) of a cream cheese mixture on a toasted, but still chewy baguette, top with slices of fresh strawberries and a drizzle of strawberry sauce, and I inhale it. I am a pig for Strawberry Bruschetta On My Plate, and don't like how much treadmill time I have to log to make up for it. *whine*


Strawberry Bruschetta
1 French baguette
1 (8 ounce) container spreadable cream cheese
1 tablespoon honey
2 cups strawberries, sliced
1/4 cup sugar-free strawberry jelly

Heat oven to 375 degrees.
Slice bread about 1/4-inch thick.
Place in a single layer on an ungreased cookie sheet.
Bake about 10 minutes or until lightly brown, turning once.
Stir together cream cheese and honey; spread on one side of each toasted baguette slice.
Arrange strawberry slices on the cream cheese.
Heat jelly in a custard cup in a microwave oven on high power for 30 seconds; stir (or heat and stir in a small saucepan until melted).
Drizzle over strawberries. (Serves about 24 slices...enough for at least 12, but maybe only one piggy person like me)

Sunday, January 11, 2009

New Year, New Foods

There is never a down day on the farm for Hubby. Livestock can't be ignored. Even on Sundays, chores need to / have to be done. On a good day with no problems, this often takes all morning. Following this, there are usually other tasks to be completed in preparation for the work of the coming week. These days, if he is home by 2:00 or 3:00pm on a Sunday, I consider myself lucky. But, it never fails, when he arrives he is starved. It's an odd time of the day...too late for lunch, too early for dinner. Often, snacks fill up the void and then compete with any dinner I may prepare.

Today, I decided to offer something different from his usual cheese and crackers, popcorn, chips or veggies and dip, or can of soup snacks. I had seen a New York Breakfast Sandwich on a popular website, and picked up the ingredients the other day during a visit to the grocery store. It seemed a perfect Sunday brunch item, even if the clock was approaching dinner time. I thought the bright flavors would satisfy his hunger, but still be a lighter option to leave room for dinner.

Smoked salmon is not new to me. I am a major fan of bagels and lox, and sometimes even snip it into my favorite egg salad (and toss in some capers). Most every Christmas season sees me preparing a smoked salmon spread for snacking with crackers. However, until now, it has mostly been a solo indulgence for me. While I did believe that Hubby would appreciate the savory flavor, I usually prepare heartier options for meals with him. It's a new year, and I think it is time to give him some new options on his plate.

He cautiously watched me prepare the first open faced sandwich. I layered on the ingredients and refused to listen to his request to omit the paper thin slices of cucumber. A couple of slices of cucumber weren't going to make him burp any more than the Mountain Dew that he was guzzling. He took a first uncertain bite, then another, and by the third chomp, I knew that I had won him over. I had just completed my own sandwich preparations when he joined me at the cutting board to make another for himself. I think that lighter options, like the New York Breakfast Sandwich, will be appearing On Our Plates a little more often in the new year.

New York Breakfast Sandwich

8 slices pumpernickel bread
1/4 cup whipped cream cheese
8 oz. thinly sliced smoked salmon
1/2 red onion, thinly sliced
1/4 English cucumber, thinly sliced
2 medium ripe tomatoes, cored, seeded, and diced
2 tsp. chopped green onions
2 tsp. capers
Salt and freshly ground black pepper to taste

Toast the bread.
Spread 1-1/2 tsp. of cream cheese on top of each slice.
Put a slice of smoked salmon, a couple of slices of onion, a slice or two of cucumber, and about 1 Tbs. of chopped tomato on top.
Sprinkle with the green onions and capers.
Season with salt and pepper. (Serves 4)
Related Posts with Thumbnails