At the South Dakota Magazine site, you can also read about South Dakota history, travel, politics, humor, and this heart-warming story of A Birthday Surprise.
Showing posts with label vegetables. Show all posts
Sunday, March 04, 2012
How Do You Get Dressed?
During the winter, salads can sometimes be lack luster. Produce isn't always the best quality, and forget about getting a decent tomato. However, last week, I shared a fresh and delicious Healthy Salad over at South Dakota Magazine that is always crisp and mouthwatering.
Labels:
avocado,
cucumber,
lettuce,
mushrooms,
onions,
radish,
salad,
South Dakota Magazine,
vegetables
Sunday, February 19, 2012
Soup for the Soul
Our weather has been so mild this winter. The days of unseasonably warm far outnumber the days of bitter cold. However, I think the weather man is forecasting the possibility of snow tomorrow. Perhaps you might like a bowl of the warm and comforting soup that I shared at South Dakota Magazine this past week.
Vegetable, Lentil, and Barley Soup isn't a pretty soup, but it is hearty and the mix of grains, vegetables and beer (yes, beer!) offers a complex flavor. I recently heard Ina Garten refer to lentils as pleasing peasant food. If this is how peasants eat, sign me up. It is delicious.
While you are visiting the South Dakota Magazine site, check out the Snowy Owl Photo Gallery. Readers submitted photos of the owls spotted across the state. Gorgeous.
Labels:
barley,
beer,
lentils,
soup,
South Dakota Magazine,
vegetables
Friday, December 10, 2010
Fridge Friday, Episode 15
I have given you 14 peeks into my fridge for Fridge Friday and today is number 15.
Broccoli with Buttered Pecans is a fabulous way to dress up a plain old vegetable. Let's face it; many won't touch cooked broccoli without cheese sauce. In our house, Hubs has given his seal of approval for Pureed Broccoli, but our favorite preparation would be roasted with garlic and finished with a squeeze of lemon. However, you don't have to be Paula Deen to quickly saute steamed broccoli in butter with the nutty benefit of pecans. After all, it isn't *that much* butter. Just a pat. Just enough to balance with the crisp earthy flavors of the fresh, green broccoli. And, PECANS. Who doesn't like pecans? Well, maybe those with nut allergies. Sorry. Maybe then cheese sauce might be better. But, as for me, I won't turn down Broccoli with Buttered Pecans On My Plate.
Arrange broccoli in a steamer basket over boiling water.
Cover and steam 4 minutes, or until tender-crisp.
Plunge the broccoli into an ice bath to stop the cooking; drain well.
Meanwhile, heat a large non-stick skillet on high.
Add the pecans and reduce heat to medium.
Stir or shake the pan for about 5 minutes until the nuts are toasted and fragrant. (Watch carefully; the oils in the nuts burn easily.)
Remove pecans from skillet and set aside.
Melt butter in same large non-stick skillet over medium heat.
Add broccoli, and pecans.
Season with salt and pepper.
Saute lightly, stirring gently, 2 to 3 minutes or until heated through. (Serves 4)
Someone asked if I clean the fridge before I take the photos. Usually, no. If I think about it, I will do a sweep of old leftovers and things past their prime on Wednesday or Thursday evening when I am cleaning up and washing dishes after dinner. Otherwise, I usually just throw open the doors (LOVE the French doors on this new fridge...enough that I wanted to replace the "O" in "LOVE" with a heart, but didn't know how to do that) and snap a pic. Today, I did pull the broccoli from the crisper drawer before I clicked the shutter. Otherwise, you wouldn't have been able to see the main ingredient for today's recipe.
Broccoli with Buttered Pecans is a fabulous way to dress up a plain old vegetable. Let's face it; many won't touch cooked broccoli without cheese sauce. In our house, Hubs has given his seal of approval for Pureed Broccoli, but our favorite preparation would be roasted with garlic and finished with a squeeze of lemon. However, you don't have to be Paula Deen to quickly saute steamed broccoli in butter with the nutty benefit of pecans. After all, it isn't *that much* butter. Just a pat. Just enough to balance with the crisp earthy flavors of the fresh, green broccoli. And, PECANS. Who doesn't like pecans? Well, maybe those with nut allergies. Sorry. Maybe then cheese sauce might be better. But, as for me, I won't turn down Broccoli with Buttered Pecans On My Plate.
1 head of broccoli, cut into florets
1 tablespoon butter
3 tablespoons chopped pecans
1/4 teaspoon kosher salt
1/4 teaspoon fresh cracked black pepper
Arrange broccoli in a steamer basket over boiling water.
Cover and steam 4 minutes, or until tender-crisp.
Plunge the broccoli into an ice bath to stop the cooking; drain well.
Meanwhile, heat a large non-stick skillet on high.
Add the pecans and reduce heat to medium.
Stir or shake the pan for about 5 minutes until the nuts are toasted and fragrant. (Watch carefully; the oils in the nuts burn easily.)
Remove pecans from skillet and set aside.
Melt butter in same large non-stick skillet over medium heat.
Add broccoli, and pecans.
Season with salt and pepper.
Saute lightly, stirring gently, 2 to 3 minutes or until heated through. (Serves 4)
Wednesday, August 11, 2010
Children of the Corn
I was a main character in my own horror movie today. No, I didn't fall prey to demonic corn-cult worshipers. It was much more urban than that. The black walnut tree that I have watched mature from a mere seedling when we bought this house was hacked up by some over-zealous tree trimmers working for the area telephone company. I no longer have a tree with branches, I have a pole with a little green stuff on top.
I am not an idiot. I do understand the importance of keeping a 6-foot radius clear around the overhead telephone/power lines. I don't want my trees rubbing against the lines and shorting out phone service or icing up in winter and taking down the entire grid in a storm. But, I also don't see why a ladder or truck couldn't be used to properly trim the trees instead of just standing on the ground and whacking off any branch that you can reach. I don't get it. I guess I just don't have the lack of caring (or common sense?) that would make me a good tree trimming employee.
To the telephone company's credit, they did respond very promptly to my call with the complaint. Someone was at my home within just a couple hours to investigate the damages. After our conference under the branchless, shadeless tree, the contractor for the tree service was brought over to discuss the next actions. The pole (that was formerly known as a black walnut tree) will be completely removed tomorrow, along with some proper trimming of other trees that could possibly cause issue for the lines in the future. Replacement is still being considered. I am weighing those options. The ending of my tree chopping horror movie is still being drafted. What other innocent souls may perish upon the return of the evil tree trimmers remains to be seen.
What does this have to do with corn? I don't know. It is just that last night I threw together what we thought was a great corn recipe and I had been trying to think of an avenue to share it here on the blog. In no way shape or form is Creamed Corn with Roasted Green Chiles and Spinach a horror. Even though it does require grasping the sweet corn nearest you and blindly whacking the corn from the cob, there is no evil in its preparation. I promise. It is also a pure common sense (possibly even for those that have none) alternative for serving up some of that sweet and juicy sweet corn that is flowing in from the gardens and fields.
So...that's my story. While I don't have any recommendations for a good tree trimming service, I do have what I think is a great side dish of Creamed Corn with Roasted Green Chiles and Spinach On My Plate.
2 tablespoons unsalted butter
1/2-3/4 cup diced onions
2 cloves garlic, minced
1 4oz can diced roasted green chiles (I used chiles from last year's garden that I had roasted, chopped, and frozen in ice cube trays...then popped into freezer bags for storage...3 cubes for this dish.)
fresh corn cut from 4-5 ears of sweet corn (or, if you must, frozen corn will work when sweet corn is not in season)
1/2 tablespoon flour
1/2-3/4 cup heavy cream
kosher salt
fresh ground black pepper
4 cups chopped fresh baby spinach
In a large skillet over medium heat, melt the butter.
Add the onions and saute until translucent.
Add the garlic, being careful not to burn.
Add the sweet corn and stir to coat with butter & onions in the pan.
Allow corn to cook slowly and almost caramelize or brown, but not burn. Stir, but not too frequently, you want a little crust.
Add the green chiles and heat through.
Add the flour and stir to coat the kernels of corn and cook out the "raw" taste.
Add the cream and bring to low simmer.
Reduce heat and simmer to desired thickness for the cream.
Season with salt and pepper to taste.
Add the chopped spinach, stir to combine with other ingredients and coat with cream sauce.
Cover skillet and simmer until spinach is wilted. (Serves 4-6)
Friday, May 21, 2010
Fridge Friday, episode 3
I have found that while Fridge Friday has so far accomplished its intended duty of prompting me to blog more regularly, it has also made me infinitely more aware of a few other things.
- I clean my fridge more often. I have to. You are looking at it every week. Yikes. Maybe I should start posting regular photos of my bed so that I will make it more often than just when someone is coming over? Umm...Not.
- I plan my menus a bit more, if only for Friday. It might surprise you, but I don't often menu plan. I go to the store, buy what looks good and come home and find something to do with it.
- And, I have learned that snapping photos inside a refrigerator is tough. The lighting sucks. That little bulb glares like an interrogation room spotlight. Unscrew it, and you have coarse, grainy light through my camera lens. Of course, that is pretty much the norm for my food pics, so what am I worried about?
So...anyway...I have been away a lot of this week, but did a big grocery purchase yesterday. Here is my fridge today:
What catches your eye? The English cucumber on the bottom shelf? The pearls of fresh mozzarella in the bottom left deli drawer? That HUGE bunch of asparagus cut fresh from my backyard? Silk soy milk? I know, there is still a lot of butter in the bottom right corner. That is what we use. Olive oil and real (unsalted) butter are my fats of choice. (I keep canola oil and a can of Pam on hand for baking, but they stay in the cupboard a lot.) Oh! Did you notice the bowl of fresh cherries on the middle shelf? It might be a little early for good fresh cherries, but I couldn't resist throwing them in my cart while shopping.
What catches my eye are the poblano peppers on the second shelf. I was giddy to find these mild chile peppers at the store. One of my favorite meatless meals is Grilled Chiles Rellenos served up with Spanish Rice and Grilled Zucchini. Of course, you wouldn't have to go meatless. The recipe that I pulled from an issue of Real Simple magazine is a great side with chicken or steaks, too. It is healthier than traditional battered and fried chile rellenos and gives a slight nod to Latin flavors with the addition of raisins for a bit of sweetness with the spicy filling. How spicy your Grilled Chiles Rellenos will be depends on your choice of chili powder and salsa. I like using Chipotle Chile Powder and my home canned salsa. Those options provide some awesome heat. However, more mild versions with regular McCormick's Chili Powder and some store-bought salsa have been just as quickly devoured. The beauty of all recipes is that they are just ideas. Mix it up. Do your own thing; even add some ground beef or turkey to the filling, if you so desire. I just want you to enjoy your own version of Grilled Chiles Rellenos On Your Plate.
Grilled Chiles Rellenos
4 poblano chiles
1 (15 ounce) can kidney beans, drained and rinsed
1 (8 ounce) package monterey jack cheese, shredded (for a more mild flavor use a Mexican blend cheese)
1/4 cup raisins (more or less, or not at all if this doesn't interest you)
1/4 cup salsa (I like a chunky salsa for this.)
2 teaspoons chili powder
Heat the grill to medium. (We like a charcoal grill for more flavor.)
Cut a slit lengthwise in each chile and carefully scoop out the seeds and ribs.
In a medium bowl, combine the beans, cheese, raisins, salsa, and chili powder. (This is the point where you would add cooked, seasoned, and crumbled ground beef or turkey, if you want to try a non-meatless version.)
Stuff the peppers with the filling.
Place peppers on grill and cook, turning frequently, until they are soft and the cheese has melted. (Serves 4)
Monday, February 15, 2010
Dull/Not Sharp
I seem to have an issue with my food photos. Try as I may, I can't fully conquer lighting issues. I submit my images to TasteSpotting and FoodGawker only to be declined time and time again. The most frequent comments on the rejections are regarding lighting, composition, and of course, "dull/not sharp."
Just as in the kitchen, I have absolutely no formal training behind the camera. Everything I do is through trial and error. From time to time, I have bookmarked informative sites full of tips and tricks for food photography, but let's face it, my attention span isn't long enough to read them, let alone actually implement any of the advice.
My camera is also very inexpensive (Canon Powershot A550) and has been dropped a time or two. The lens was even jammed half in and half out after one unfortunate kiss of the concrete. It has seen better days, but for my limited skills and budget, it does the job...except for those pesky rejections. (Thank goodness for TasteStopping.)
It seems that it has come to the point where I have to decide if I really want to work to improve my photos, or if I am OK with being labeled as Dull/Not Sharp. While I want my photo quality to be good enough for you to want to try the recipe, I am not sure I want to invest more time/money/energy in them. It is important to me that all parts of this blog remain fun. I don't want to feel like I am tied to a ball and chain of yet more work. There is enough going on in my life that I don't enjoy; this blog and producing photos for it should never fall into that category. I think that I would rather play with the food On My Plate than with the camera.
So for now, you will have to suffer through my Dull/Not Sharp photos to accompany my tried and true recipes. I think that I have a doozy for you today. Green Beans with Garlic, Basil and Cherry Tomatoes has been in mind to share almost since the beginning of On My Plate. Its bright and crisp (not dull/not sharp) flavors have been paired as a side with many meals, but I have never managed an acceptable photo. Today was not an exception. The afternoon light glared on the beans making them appear greasy. Appetizing, huh? Sorry. Please forgive the photo and grab the recipe. You will be sorry if you decline to sample Green Beans with Garlic, Basil and Cherry Tomatoes On YOUR Plate.

Bring large pot of salted water to boil and add beans; simmer until tender.
In large skillet or saute pan, melt butter.
Add garlic, sugar, basil, salt and pepper.
Add tomatoes; cook until heated, but not mushy.
Add the drained beans and toss to coat with the garlic/basil butter. (Serves 4)
Just as in the kitchen, I have absolutely no formal training behind the camera. Everything I do is through trial and error. From time to time, I have bookmarked informative sites full of tips and tricks for food photography, but let's face it, my attention span isn't long enough to read them, let alone actually implement any of the advice.
My camera is also very inexpensive (Canon Powershot A550) and has been dropped a time or two. The lens was even jammed half in and half out after one unfortunate kiss of the concrete. It has seen better days, but for my limited skills and budget, it does the job...except for those pesky rejections. (Thank goodness for TasteStopping.)
It seems that it has come to the point where I have to decide if I really want to work to improve my photos, or if I am OK with being labeled as Dull/Not Sharp. While I want my photo quality to be good enough for you to want to try the recipe, I am not sure I want to invest more time/money/energy in them. It is important to me that all parts of this blog remain fun. I don't want to feel like I am tied to a ball and chain of yet more work. There is enough going on in my life that I don't enjoy; this blog and producing photos for it should never fall into that category. I think that I would rather play with the food On My Plate than with the camera.
So for now, you will have to suffer through my Dull/Not Sharp photos to accompany my tried and true recipes. I think that I have a doozy for you today. Green Beans with Garlic, Basil and Cherry Tomatoes has been in mind to share almost since the beginning of On My Plate. Its bright and crisp (not dull/not sharp) flavors have been paired as a side with many meals, but I have never managed an acceptable photo. Today was not an exception. The afternoon light glared on the beans making them appear greasy. Appetizing, huh? Sorry. Please forgive the photo and grab the recipe. You will be sorry if you decline to sample Green Beans with Garlic, Basil and Cherry Tomatoes On YOUR Plate.

Green Beans with Garlic, Basil and Cherry Tomatoes
1 1/2 pounds fresh green beans
1 tablespoon butter
2 cloves garlic, minced
1 tablespoon sugar
2-3 tablespoons fresh basil, chopped
kosher salt
fresh ground black pepper
1/2 pint cherry or grape tomatoes (halved if large)
2 cloves garlic, minced
1 tablespoon sugar
2-3 tablespoons fresh basil, chopped
kosher salt
fresh ground black pepper
1/2 pint cherry or grape tomatoes (halved if large)
Bring large pot of salted water to boil and add beans; simmer until tender.
In large skillet or saute pan, melt butter.
Add garlic, sugar, basil, salt and pepper.
Add tomatoes; cook until heated, but not mushy.
Add the drained beans and toss to coat with the garlic/basil butter. (Serves 4)
Labels:
basil,
food,
garlic,
green beans,
tomato,
vegetables
Thursday, January 21, 2010
Squashed
I guess that given my recent absence, it is no secret that I am feeling a little squashed lately. My world is made up of too many people with too many demands on too little time. I am singing that same old song of how I can't keep up. However, I read something recently that hit home. Basically, it said, "Sorry that you are busy, but guess what, we all are."
Yes. Slap me with reality. Everyone is busy. Everyone has lists of things to do. I need to get over it, and follow another bit of reality from the article...reduce. I wouldn't feel so squashed if I didn't try to cram so much into each minute of every day. I need to focus on what needs to be done, what will benefit in the long run, and most of all what will bring me contentment and peace. I need to stop allowing outside influences to dictate me and become comfortable in my own life with my own decisions.
One decision that always brings me comfort is to serve Roasted Butternut Squash with Shallots. I grew up with butternut squash being a staple on our holiday table instead of sweet potatoes. Then, it was topped with marshmallows for eewy-gooey goodness. Now, the natural sweetness of the vegetable (yes, I know that squash is actually a fruit...work with me here) is the star of the dish. Just a hint of brown sugar is all that is needed with the caramelized shallots to bring it all together.
Nope. I don't feel Squashed at all with Roasted Butternut Squash with Shallots On My Plate.

Roasted Butternut Squash with Shallots
3 cups butternut squash, peeled and cubed
1 tablespoon brown sugar
2 1/2 teaspoon olive oil
1 teaspoon kosher salt
1/2 teaspoon fresh cracked pepper
8 shallots, peeled and sliced
1 tablespoon brown sugar
2 1/2 teaspoon olive oil
1 teaspoon kosher salt
1/2 teaspoon fresh cracked pepper
8 shallots, peeled and sliced
Preheat oven to 475.
Lightly spray sheet pan.
Toss together all ingredients on pan, coating well; arrange in a single layer.
Roast for 20 minutes, or until squash is tender and shallots are caramelized; stir half way through. (Serves 4.)
Lightly spray sheet pan.
Toss together all ingredients on pan, coating well; arrange in a single layer.
Roast for 20 minutes, or until squash is tender and shallots are caramelized; stir half way through. (Serves 4.)
Sunday, May 10, 2009
Batching It
I am supposed to be out of town right now. I had an incredible little get-away planned with some long-time girlfriends. However, my stomach decided that I shouldn't do it. It rebelled in ugly ways, and I wasn't able to make the drive to the airport, or catch the plane, or fly with the girls, or spend several days of complete silliness and total fun with some of the people who mean the most to me. I am stuck at home...feeling a bit physically stronger each day, but still feeling horribly sad that I have missed out on that joyous reunion. Being sick sucks. But, that is another story that I really don't need to go into here. Who wants to read about nasty bodily functions in a food blog?
The halting of my travel plans created a major change in menu for Hubby. Instead of spattering grease while frying up juicy burgers the size of my head, simmering cauldron sized pots of chili, frequently hitting the local Chinese buffet, heating corn dogs in the oven, and making the treat that the pups always look forward to..."Pupperoni" Pizza, I am here to keep order in the kitchen. I think he is disappointed. He actually does like to cook and play around with ingredients, and pizza is one of his greatest playgrounds.
He piles his pies (sometimes using a frozen pizza as the base, sometimes using a crust from a tube, sometimes making it all from scratch) with anything that he can get his hands on. He has a true bachelor style in the kitchen though, and meat always plays a starring role. You can't have Pupperoni Pizza without lots and lots of pepperoni. There have to be enough of those little spicy spheres to eat and to share with the pups, of course. It is the rule.
So...even though I am here, how can I deny him his pizza? However, I am going to go for a different batch on my pizza. I am going to roast up a batch of beautiful vegetables and load my crust with their garlicky, flavorful goodness. In the past, I have used whatever cheese I happened to have on hand from the standard mozzarella, to feta, to Monterrey jack. I do have to say that the Monterrey Jack has come away as the leader. It's extra kick of flavor really complements the robustness of the veggies. I don't even miss the pepperoni when I have Roasted Veggie Pizza On My Plate.
Preheat oven to 425°F
Use 1 tsp of olive oil to coat baking stone or pizza pan.
Spread out pizza dough and bake at 425°F for 7 minutes.
Combine 1 tsp olive oil, thyme, salt, garlic, zucchini, mushrooms, bell pepper, and onion on a sheet pan and toss to coat well.
Spread into a single layer and roast at 500°F for 7 minutes.
Stir the vegetables and roast for another 7 minutes.
Sprinkle half the cheese over the pizza crust.
Spread the roasted vegetables over the cheese.
Top the vegetables with the remaining cheese.
Bake at 425°F for 15 minutes, or until the crust is lightly browned and cheese is melted.
Top with Parmesan cheese to garnish. (Serves 4-6)
The halting of my travel plans created a major change in menu for Hubby. Instead of spattering grease while frying up juicy burgers the size of my head, simmering cauldron sized pots of chili, frequently hitting the local Chinese buffet, heating corn dogs in the oven, and making the treat that the pups always look forward to..."Pupperoni" Pizza, I am here to keep order in the kitchen. I think he is disappointed. He actually does like to cook and play around with ingredients, and pizza is one of his greatest playgrounds.
He piles his pies (sometimes using a frozen pizza as the base, sometimes using a crust from a tube, sometimes making it all from scratch) with anything that he can get his hands on. He has a true bachelor style in the kitchen though, and meat always plays a starring role. You can't have Pupperoni Pizza without lots and lots of pepperoni. There have to be enough of those little spicy spheres to eat and to share with the pups, of course. It is the rule.

Roasted Veggie Pizza
2 teaspoons olive oil
1 tablespoon fresh thyme
1/4 teaspoon coarse salt
5-6 garlic cloves, thinly sliced
2 small zucchini, cut into thin slices
1 tablespoon fresh thyme
1/4 teaspoon coarse salt
5-6 garlic cloves, thinly sliced
2 small zucchini, cut into thin slices
6-10 mushrooms, thinly sliced
1 red bell pepper, cut into strips
1 red onion, cut into wedges and then sliced
1 3/4 cups Monterrey Jack cheese, grated
1 tube pizza dough (or your favorite recipe)
freshly grated Parmesan cheese, to taste
1 red bell pepper, cut into strips
1 red onion, cut into wedges and then sliced
1 3/4 cups Monterrey Jack cheese, grated
1 tube pizza dough (or your favorite recipe)
freshly grated Parmesan cheese, to taste
Preheat oven to 425°F
Use 1 tsp of olive oil to coat baking stone or pizza pan.
Spread out pizza dough and bake at 425°F for 7 minutes.
Combine 1 tsp olive oil, thyme, salt, garlic, zucchini, mushrooms, bell pepper, and onion on a sheet pan and toss to coat well.
Spread into a single layer and roast at 500°F for 7 minutes.
Stir the vegetables and roast for another 7 minutes.
Sprinkle half the cheese over the pizza crust.
Spread the roasted vegetables over the cheese.
Top the vegetables with the remaining cheese.
Bake at 425°F for 15 minutes, or until the crust is lightly browned and cheese is melted.
Top with Parmesan cheese to garnish. (Serves 4-6)
Labels:
cheese,
comfort food,
food,
garlic,
mushrooms,
onions,
peppers,
pizza,
vegetables,
zucchini
Thursday, January 22, 2009
I Smell Summertime In My Backyard
Today's temps hit the 50s, and the sun stayed high in the sky and shone brightly. Even the winds were calm, making it an absolutely picture perfect day. It was like summertime in the middle of January as kids shed their coats and ran the streets in just T-shirts. I bet if I would have looked hard enough, I could have even found some brave souls in shorts.
I didn't take it that far. I ran my errands in a long sleeved T-shirt, but jeans were a better choice for me (and everyone) with my pasty, winter, white legs. I couldn't, however, resist the lure of the grill. Beautiful, clear January days like this don't happen that often on the prairie. It was time to light the charcoal.
Strip steaks only need a rub with our favorite steak seasoning before being placed over the coals. Potatoes are a standard side, but that seemed to cling to the heaviness of winter. This unseasonably warm day required that I pull out a variation of a lighter side dish that is very popular with us during the summer months. Garden fresh herbs and vegetables always make a sauteed veggie side dish that is full of flavor. However, since gardening is still months away, canned tomatoes make an appearance but don't disappoint one bit in a Zucchini and Tomato Toss.
Of course, I couldn't serve a meal here in the heartland without the required starch, and since potatoes were dropped, My Favorite Cheesy Garlic Bread is mandatory. It pairs perfectly with the steaks and vegetables to round out a hearty meal, but the topping could easily be spread on baguette slices and toasted as an appetizer or served with a green salad for an incredible lunch.
The coals of the grill are ready, and my backyard smells like summertime. I am ready for a first-rate summer dinner in January to land On My Plate.

Heat oil in a saute pan.
Saute the onion until tender, add garlic.
Add the sliced zucchini and cook until tender-crisp.
Season to taste with seasoning salt and fresh ground pepper.
Add the tomatoes and herbs; simmer a few minutes for the flavors to meld.
Remove from heat and serve with Parmesan cheese on top. (Serves 4)

Slice or halve the bread and brush one side of slices, or cut side of halves, with olive oil.
Place the bread under the broiler to toast. Watch closely and remove before too browned.
Mix the garlic, mayonnaise, and Parmesan together.
Spread on toasted bread.
Return bread to under the broiler until the topping is bubbly and slightly browned.
Garnish with parsley. (Serves 8)
I didn't take it that far. I ran my errands in a long sleeved T-shirt, but jeans were a better choice for me (and everyone) with my pasty, winter, white legs. I couldn't, however, resist the lure of the grill. Beautiful, clear January days like this don't happen that often on the prairie. It was time to light the charcoal.
Strip steaks only need a rub with our favorite steak seasoning before being placed over the coals. Potatoes are a standard side, but that seemed to cling to the heaviness of winter. This unseasonably warm day required that I pull out a variation of a lighter side dish that is very popular with us during the summer months. Garden fresh herbs and vegetables always make a sauteed veggie side dish that is full of flavor. However, since gardening is still months away, canned tomatoes make an appearance but don't disappoint one bit in a Zucchini and Tomato Toss.
Of course, I couldn't serve a meal here in the heartland without the required starch, and since potatoes were dropped, My Favorite Cheesy Garlic Bread is mandatory. It pairs perfectly with the steaks and vegetables to round out a hearty meal, but the topping could easily be spread on baguette slices and toasted as an appetizer or served with a green salad for an incredible lunch.
The coals of the grill are ready, and my backyard smells like summertime. I am ready for a first-rate summer dinner in January to land On My Plate.

Zucchini and Tomato Toss
1 large fresh zucchini, sliced
1 medium onion, chopped
1 clove garlic, minced
olive oil
seasoning salt
fresh ground pepper
1 can diced tomatoes with Italian seasonings
fresh basil
fresh oregano
grated Parmesan cheese
1 medium onion, chopped
1 clove garlic, minced
olive oil
seasoning salt
fresh ground pepper
1 can diced tomatoes with Italian seasonings
fresh basil
fresh oregano
grated Parmesan cheese
Heat oil in a saute pan.
Saute the onion until tender, add garlic.
Add the sliced zucchini and cook until tender-crisp.
Season to taste with seasoning salt and fresh ground pepper.
Add the tomatoes and herbs; simmer a few minutes for the flavors to meld.
Remove from heat and serve with Parmesan cheese on top. (Serves 4)

My Favorite Cheesy Garlic Bread
1 loaf French bread, thickly sliced or halved lengthwise
olive oil
6 cloves garlic, minced
3/4 cup mayonnaise
1 cup grated Parmesan cheese
fresh parsley, chopped for garnish
olive oil
6 cloves garlic, minced
3/4 cup mayonnaise
1 cup grated Parmesan cheese
fresh parsley, chopped for garnish
Slice or halve the bread and brush one side of slices, or cut side of halves, with olive oil.
Place the bread under the broiler to toast. Watch closely and remove before too browned.
Mix the garlic, mayonnaise, and Parmesan together.
Spread on toasted bread.
Return bread to under the broiler until the topping is bubbly and slightly browned.
Garnish with parsley. (Serves 8)
Labels:
breads,
cheese,
comfort food,
food,
garlic,
tomato,
vegetables,
zucchini
Thursday, January 01, 2009
Resolutions
What other topic could a January 1 blog post have other than resolutions? Many of us make them and break them. Some try harder than others to achieve their goals, and some just can't be bothered. In the past, I honestly wasn't one for making resolutions. I would think about those few pounds I wanted to drop, or the lack of a consistently healthy diet, or my neglect to my treadmill, or those credit card purchases that I probably shouldn't have made, but never really made any New Year's promises to myself.
Last year, I changed that. I made my first real resolution. Surprisingly, given my food obsession, it wasn't about food, or dieting, or even working out in order to be able to eat more food. I decided to better my life by changing the way I was living.
On the surface, my home has usually appeared clean and tidy. However, don't open any door without permission or you might be met with piles that would threaten to avalanche at any moment. Every nook and cranny of my home was filled to capacity, and yet I continued to stuff more into the already crowded drawers, closets, and cupboards. I was becoming my my mother. The pack rat gene had taken hold.
It was time to halt the madness. I resolved to clear one piece of clutter a day. I knew that if I made grand plans, I would fail. I am not a grand plan kind of gal. I take things step by step and see what happens. My anal side does require that I have a plan, but I fly by the seat of my pants to achieve it. I did the same with my clutter. One day's clutter might simply be dealing with the mail as soon as I received it. Toss the junk; file the bills and important stuff. Easy, right? I could do that. The next day, I would have more time and decide that everything from the deep, dark recesses of the front closet had to come out and be sorted. Of course, piling it all on the sofa required that I have my task complete by the time Hubby returned home, or we would have no where to lounge in the evening. I sometimes needed those kinds of incentives to kick myself in the butt. But, I did it all bit by bit, piece by piece, junk by junk, and in some cases, trash by trash.
I am happy to report that I did succeed in keeping last year's resolution. Most of my home is now clutter free. I am not afraid of people peeping into my closets or of asking someone to get something from the pantry for me. The local Thrift Store has been thrilled with my donations while the trash collectors have cussed at the weight of my garbage can, and my home is happier for it. I still have a few spots that need some polishing, and I don't lie to myself that this job will ever be complete. Keeping a clean and tidy home inside and out is work, but I am not afraid. I am resolved to conquer clutter.
This year, I have new resolutions. Again, no food, dieting, or working out is involved (not that those areas of my life don't need a little help now and then). Oddly enough, I found my inspiration imprinted on some of my holiday gift wrap. LIVE JOYFULLY; GIVE GENEROUSLY; BELIEVE COMPLETELY; CELEBRATE LOVINGLY Good, huh? Aspirations that, hopefully, will make me a better person. I have no doubts that this will be harder than conquering clutter. I will need to be aware of myself and the effect of my actions on others. There will probably be times that I would rather clean the inside of a closet than clean the inside of my soul. Still, I am going to give it a go. What's the worst that can happen? I will be bad and know it? Isn't being aware still better than just being bad? ...am I talking in circles and being crazy? Probably. I still hope to live, give, believe, and celebrate to the best of my abilities in 2009.
But now, since my blog is entitled On My Plate, I should probably post a recipe, huh? How about something for those of you that HAVE resolved to improve your diet, drop a few pounds, work out more, be healthier, or eat more veggies? In addition to cleaning drawers and crawl spaces last year, I did manage to drop those ugly extra pounds that I had been carrying around. I searched out some healthy ways to fill my tummy and fuel my food obsession. This Slow Cooker Vegetable Soup is a great light meal or snack that is satisfying, and most importantly, full of flavor. Because, after all, if it doesn't taste good, I don't want it On My Plate.
Last year, I changed that. I made my first real resolution. Surprisingly, given my food obsession, it wasn't about food, or dieting, or even working out in order to be able to eat more food. I decided to better my life by changing the way I was living.
On the surface, my home has usually appeared clean and tidy. However, don't open any door without permission or you might be met with piles that would threaten to avalanche at any moment. Every nook and cranny of my home was filled to capacity, and yet I continued to stuff more into the already crowded drawers, closets, and cupboards. I was becoming my my mother. The pack rat gene had taken hold.
It was time to halt the madness. I resolved to clear one piece of clutter a day. I knew that if I made grand plans, I would fail. I am not a grand plan kind of gal. I take things step by step and see what happens. My anal side does require that I have a plan, but I fly by the seat of my pants to achieve it. I did the same with my clutter. One day's clutter might simply be dealing with the mail as soon as I received it. Toss the junk; file the bills and important stuff. Easy, right? I could do that. The next day, I would have more time and decide that everything from the deep, dark recesses of the front closet had to come out and be sorted. Of course, piling it all on the sofa required that I have my task complete by the time Hubby returned home, or we would have no where to lounge in the evening. I sometimes needed those kinds of incentives to kick myself in the butt. But, I did it all bit by bit, piece by piece, junk by junk, and in some cases, trash by trash.
I am happy to report that I did succeed in keeping last year's resolution. Most of my home is now clutter free. I am not afraid of people peeping into my closets or of asking someone to get something from the pantry for me. The local Thrift Store has been thrilled with my donations while the trash collectors have cussed at the weight of my garbage can, and my home is happier for it. I still have a few spots that need some polishing, and I don't lie to myself that this job will ever be complete. Keeping a clean and tidy home inside and out is work, but I am not afraid. I am resolved to conquer clutter.
This year, I have new resolutions. Again, no food, dieting, or working out is involved (not that those areas of my life don't need a little help now and then). Oddly enough, I found my inspiration imprinted on some of my holiday gift wrap. LIVE JOYFULLY; GIVE GENEROUSLY; BELIEVE COMPLETELY; CELEBRATE LOVINGLY Good, huh? Aspirations that, hopefully, will make me a better person. I have no doubts that this will be harder than conquering clutter. I will need to be aware of myself and the effect of my actions on others. There will probably be times that I would rather clean the inside of a closet than clean the inside of my soul. Still, I am going to give it a go. What's the worst that can happen? I will be bad and know it? Isn't being aware still better than just being bad? ...am I talking in circles and being crazy? Probably. I still hope to live, give, believe, and celebrate to the best of my abilities in 2009.

Slow Cooker Vegetable Soup
10 ounces baby spinach, washed
2 medium carrots, chopped
2 medium celery ribs, chopped
1 large onion, chopped
1 garlic clove, minced
4 cups low sodium chicken broth
1 (28 ounce) can diced tomatoes with garlic and olive oil
2 leaves bay leaves
1 tablespoon dried basil
1 teaspoon dried oregano
1/2 teaspoon red pepper flakes, crushed
Place all ingredients in a slow cooker.
Cover and cook on high for 5 hours or low for 8-10 hours.
Remove bay leaves before serving. (About 8 (1 cup) servings)
Cover and cook on high for 5 hours or low for 8-10 hours.
Remove bay leaves before serving. (About 8 (1 cup) servings)
Labels:
comfort food,
crockpot,
dieting,
food,
light,
soup,
vegetables
Monday, March 17, 2008
Dressing Up
I will admit it. I always have a bottle of Hidden Valley in my fridge. There are some things that just scream to be dipped in this sinful, creamy concoction. It seems that whenever I give in to a junk food craving, calories, fat, and overall good taste are of no consideration. I must squirt Ranch dressing beside a healthy glob of ketchup (Heinz only, please) on my plate for dipping my steak fries, cheese balls, onion rings, and even chicken strips. Forget the extra marinara, I even dip my pepperoni pizza in Ranch. (Yes. You can slap me.)
However, when I fill my plate with salad greens, I usually want something more refined. I turn my nose up at the idea of the powdered herb flavors from that creamy, white dressing. It's good enough for my fried junk, but for my real food, I want a real dressing. I become a snob. I want to dress up my salad and showcase the fresh veggies. I don't want to disguise my greens under a snowy gush from the bottle in the fridge.
It's easy to dress up even a simple salad of baby greens and boiled eggs with a tangy, mustardy vinaigrette. The dressing wakes up the delicate flavors of the veggies instead of coating and weighing them down. It is all so fresh, the way I want my salads to be. My inner salad dressing snob is happy with Baby Greens and Mustard Vinaigrette On My Plate.
Peel and chop eggs.
Combine next 5 ingredients and process until smooth with a hand held blender (or shake in a jar).
Place lettuce in a bowl, add dressing and eggs, and toss gently. (Serves 6)
However, when I fill my plate with salad greens, I usually want something more refined. I turn my nose up at the idea of the powdered herb flavors from that creamy, white dressing. It's good enough for my fried junk, but for my real food, I want a real dressing. I become a snob. I want to dress up my salad and showcase the fresh veggies. I don't want to disguise my greens under a snowy gush from the bottle in the fridge.
It's easy to dress up even a simple salad of baby greens and boiled eggs with a tangy, mustardy vinaigrette. The dressing wakes up the delicate flavors of the veggies instead of coating and weighing them down. It is all so fresh, the way I want my salads to be. My inner salad dressing snob is happy with Baby Greens and Mustard Vinaigrette On My Plate.

Baby Greens and Mustard Vinaigrette
4 hard cooked eggs
1 tablespoon honey
2 tablespoons Dijon mustard
1/2 teaspoon fresh ground pepper
1/2 teaspoon kosher salt
2 tablespoons red wine vinegar
6 tablespoons extra virgin olive oil
10 ounces mixed baby greens
1 tablespoon honey
2 tablespoons Dijon mustard
1/2 teaspoon fresh ground pepper
1/2 teaspoon kosher salt
2 tablespoons red wine vinegar
6 tablespoons extra virgin olive oil
10 ounces mixed baby greens
Peel and chop eggs.
Combine next 5 ingredients and process until smooth with a hand held blender (or shake in a jar).
Place lettuce in a bowl, add dressing and eggs, and toss gently. (Serves 6)
Monday, March 03, 2008
Gag Them With Some Soup
I have previously mentioned how much I loved the Fresh Pea Soup that I saw featured on an episode of Barefoot Contessa. It's flavor truly is fresh, light, and wonderfully creamy and filling, while not at all heavy and cloying. I prepared my version minus the mint that Ina had used and with frozen peas, as fresh just aren't available this time of year. Each bowl full was an immense pleasure.
However, when I took leftovers to school on a day of subbing in Second Grade, I think that I was the only one who was in love with the beautiful green concoction. As the students were lining up for lunch, I pulled the Gladware from my bag and was met with a chorus of "What is THAT??!!??" The school colors may be green and white, but green soup was pushing things for those kids. They immediately made gagging noises at my explanation of pea soup and tried to rearrange themselves in line so as to not have to sit next to or across from me at the lunch table.
After they are settled in with their unappetizing trays of chicken nuggets, tater tots, and assorted almost-might-be-veggies, the class has a practice of observing 10 minutes of silence for focusing on eating before socializing takes over. During this time, only the teacher and those called on have permission to talk. Puke faces, held noses, and rolling eyes met my steaming bowl of soup. One little boy even asked if I could find another teacher to sit with them so that they didn't have to witness the misery that was my lunch.
I held fast and was amused with their disgust. They just couldn't appreciate the beauty of a pure and bright soup loaded with simple flavors that just shine. If you aren't gagging with the Second Graders, I invite you to add some Fresh Pea Soup to your menus. I am not sorry it jumped On My Plate.
Heat the butter in a large saucepan, add the leeks and onion, and cook over medium-low heat for 5 to 10 minutes, until the onion is tender.
Add the chicken stock, increase the heat to high, and bring to a boil.
Add the peas and cook for 3 to 5 minutes, until the peas are tender. (Frozen peas will take only 3 minutes.)
Off the heat, add the salt, and pepper.
Puree the soup in batches: place 1 cup of soup in a blender, place the lid on top, and puree on low speed.
With the blender still running, open the venthole in the lid and slowly add more soup until the blender is three-quarters full.
Pour the soup into a large bowl and repeat until all the soup is pureed.
Whisk in the creme fraiche and chives and taste for seasoning.
Serve hot with garlic croutons. (Serves 6.)
However, when I took leftovers to school on a day of subbing in Second Grade, I think that I was the only one who was in love with the beautiful green concoction. As the students were lining up for lunch, I pulled the Gladware from my bag and was met with a chorus of "What is THAT??!!??" The school colors may be green and white, but green soup was pushing things for those kids. They immediately made gagging noises at my explanation of pea soup and tried to rearrange themselves in line so as to not have to sit next to or across from me at the lunch table.
After they are settled in with their unappetizing trays of chicken nuggets, tater tots, and assorted almost-might-be-veggies, the class has a practice of observing 10 minutes of silence for focusing on eating before socializing takes over. During this time, only the teacher and those called on have permission to talk. Puke faces, held noses, and rolling eyes met my steaming bowl of soup. One little boy even asked if I could find another teacher to sit with them so that they didn't have to witness the misery that was my lunch.

Fresh Pea Soup
2 tablespoons unsalted butter
2 cups leeks, white and light green parts chopped
1 cup yellow onions, chopped
4 cups chicken stock
2 (10 ounce)packages frozen peas
2 teaspoons kosher salt
1/2 teaspoon fresh ground black pepper
1/2 cup creme fraiche
1/2 cup chives, chopped
garlic croutons, for serving
2 cups leeks, white and light green parts chopped
1 cup yellow onions, chopped
4 cups chicken stock
2 (10 ounce)packages frozen peas
2 teaspoons kosher salt
1/2 teaspoon fresh ground black pepper
1/2 cup creme fraiche
1/2 cup chives, chopped
garlic croutons, for serving
Heat the butter in a large saucepan, add the leeks and onion, and cook over medium-low heat for 5 to 10 minutes, until the onion is tender.
Add the chicken stock, increase the heat to high, and bring to a boil.
Add the peas and cook for 3 to 5 minutes, until the peas are tender. (Frozen peas will take only 3 minutes.)
Off the heat, add the salt, and pepper.
Puree the soup in batches: place 1 cup of soup in a blender, place the lid on top, and puree on low speed.
With the blender still running, open the venthole in the lid and slowly add more soup until the blender is three-quarters full.
Pour the soup into a large bowl and repeat until all the soup is pureed.
Whisk in the creme fraiche and chives and taste for seasoning.
Serve hot with garlic croutons. (Serves 6.)
Saturday, July 21, 2007
Cool as a Cucumber
As summer heats up around us and temperatures approach 100, we are all looking for ways to stay cool. Farmers in the field are drinking their weight in water; dogs are seeking the shadiest of shade trees; kids take refuge in the pool; and air conditioning is working at full blast. I am very grateful that we finally made the heat pump upgrade for our heating and cooling system. Central air is a wonderful thing...even though Hubby keeps it cranked to frigid temps that leave me looking for a sweater in July.
Most of us don't want to heat up the house with hot meals. A simple cucumber salad is the perfect summer tonic. The usual preparation out here on the prairie has a creamy dressing and onions and/or tomatoes. I like to vary things a bit and add a little Asian flare to my cukes. It is great as a side to grilled chicken or steak with the cool cucumbers being so refreshing On My Plate.
Bring vinegar and sugar to a simmer, stirring until sugar is dissolved, then cool to room temperature.
Stir in soy sauce and sesame oil.
Cut cucumbers lengthwise into 1/8-inch-thick ribbons using a mandolin slicer.
Toss cucumber with dressing and let stand 5 minutes before serving.
Note: Do not let dressed cucumber salad stand for more than 20 minutes before serving, or it the texture of the cucumbers will be soggy. (Serves 4.)

Asian Cucumber Ribbons
¼ cup rice wine vinegar
½ teaspoon sugar
1 teaspoon soy sauce
½ teaspoon sesame oil
1 ½ English cucumbers, halved lengthwise
½ teaspoon sugar
1 teaspoon soy sauce
½ teaspoon sesame oil
1 ½ English cucumbers, halved lengthwise
Bring vinegar and sugar to a simmer, stirring until sugar is dissolved, then cool to room temperature.
Stir in soy sauce and sesame oil.
Cut cucumbers lengthwise into 1/8-inch-thick ribbons using a mandolin slicer.
Toss cucumber with dressing and let stand 5 minutes before serving.
Note: Do not let dressed cucumber salad stand for more than 20 minutes before serving, or it the texture of the cucumbers will be soggy. (Serves 4.)
Tuesday, January 30, 2007
Sizzling
Sizzling can be a warm and comforting sound when it is coming from a pan of bacon. But, when it is your desk lamp that is sizzling, sparking, and smoking, there is no comfort. Yesterday, as I was sitting at my desk, surfing the web, and working on a project, the light bulb in my desk lamp burned out. The darkness in my already dim (although, I like to think of it as cozy) office was tolerable, and I continued to work while making a mental note to grab a new light bulb when I made my next trip to the basement storage area.
Suddenly, I had 4th of July fireworks sparking at me, and the stench of burn electric components filled the air. The burned out light bulb was frying in the lamp. Quickly, I ducked under the desk and unplugged it. Free from the electrical source, the almost fire quickly died out. Although the putrid smokey smell still hangs in the air, I am glad that it is the only casualty (other than the lamp which has since been deposited into the dumpster). If I had been at work instead of hanging out at home today, I could have come home to a charred office...or no home at all.
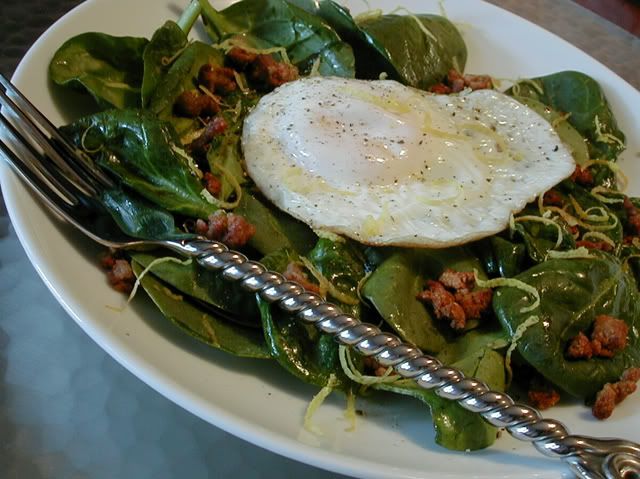
Frying light bulbs have not turned me off of frying in the kitchen, though. Today's lunch is a salad that I gleaned from an issue of Every Day with Rachel Ray. I had never had a salad topped with a fried egg before this, but have fallen in love with this combination of flavors. I am a poached egg lover, and prepare my egg with a runny yolk to form a rich dressing for the greens. However, if you are leery of fried things or don't care for runny yolks, scrambled or boiled eggs would work just as well to top this fresh lemony salad. Be sure to break the sausage up into little pieces and fry until crisp...almost like little sausage versions of bacon bits. The sizzle and snap of frying can be a good thing, when it lands on my plate.
Suddenly, I had 4th of July fireworks sparking at me, and the stench of burn electric components filled the air. The burned out light bulb was frying in the lamp. Quickly, I ducked under the desk and unplugged it. Free from the electrical source, the almost fire quickly died out. Although the putrid smokey smell still hangs in the air, I am glad that it is the only casualty (other than the lamp which has since been deposited into the dumpster). If I had been at work instead of hanging out at home today, I could have come home to a charred office...or no home at all.

Warm Spinach and Sausage Salad
12 ounces bulk pork sausage
2 ½ tablespoons olive oil
1 teaspoon lemon zest, grated
1 ½ tablespoons fresh lemon juice
6 ounces baby spinach
coarse salt
fresh ground black pepper
4 large eggs
12 ounces bulk pork sausage
2 ½ tablespoons olive oil
1 teaspoon lemon zest, grated
1 ½ tablespoons fresh lemon juice
6 ounces baby spinach
coarse salt
fresh ground black pepper
4 large eggs
In a large nonstick skillet, cook the sausage over medium heat, breaking it up with a wooden spoon, until crumbly and crisp, about 10 minutes.
Remove the sausage to a bowl with a slotted spoon and return the skillet to the stove.
Add the olive oil, zest and juice to the pan and, over medium-high heat, stir the mixture with a wooden spoon, scraping up any brown bits, for about 1 minute.
Remove pan from the heat.
Add the spinach and use tongs to coat the leaves with the dressing.
Sprinkle the salad generously with salt and pepper.
Divide the spinach evenly among 4 bowls and top with the crumbled sausage.
Wipe the nonstick skillet clean with a paper towel and fry each egg over easy.
Top each salad with a fried egg and serve. (Serves 4)
Friday, January 26, 2007
New Year, New You
I haven't made any New Year's resolutions to lose weight. I probably could stand to drop a few pounds, as my jeans are still a little tighter than I would like. But, instead of focusing on weight loss, I am trying to continue with my previous goal to eat balanced meals and be active. Yes, sometimes my meals are very high in fat, calories, and all of those other sinful components. I like comfort food. I am not going to avoid that. What I do is try to balance a heavy meal with a few lighter ones. Creamy, cheesy baked tortellini is followed by salads for lunch and snacks of fruit, whole grains, and lean proteins. A few extra minutes on the treadmill, or an extra set of sit-ups doesn't hurt either.
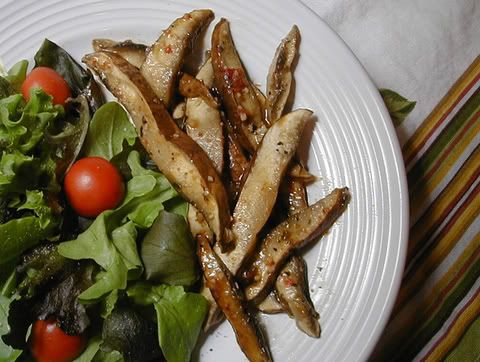
But, an avid reader reminded me that my blog isn't currently reflecting that balance. My January meals have appeared to be very heavy On My Plate. I think it is time to share something lighter, but still delicious and filling. It is time for a main dish salad that is so yummy that even those who think that the only good salad is covered with ranch dressing and cheese will eat it. Sauteed Mushrooms are a filling source of protein and make a great topping for a bed of mixed greens and cherry tomatoes. As the mushrooms are marinated in flavorful Italian dressing, no additional dressing on the salad is really even necessary. It's a light meal that this comfort food girl loves On My Plate.
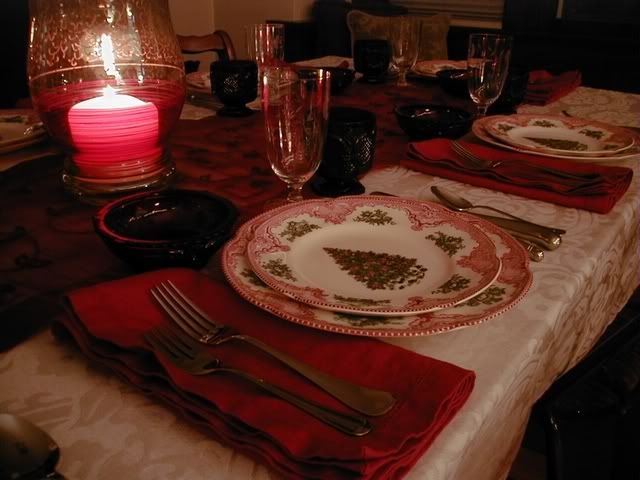
Sauteed Mushrooms Over Green Salad
4 Portabello mushrooms
1/2 - 1 cup Italian dressing
salt and pepper
1 bag mixed salad greens
cherry tomatoes
4 Portabello mushrooms
1/2 - 1 cup Italian dressing
salt and pepper
1 bag mixed salad greens
cherry tomatoes
Scrape out belly of mushroom and slice into strips.
Sauté in pan with Italian dressing and seasonings until tender.
Serve on top of bed of mixed salad greens and cherry tomatoes.
Season with salt and pepper. (Serves 4)
Wednesday, January 10, 2007
Prime Time

Two of Hubby's sisters, their husbands, and my in-laws joined us at our Christmas dinner table for a meal that they claim was fit for a king. I have only prepared prime rib 3 other times, and one of those times I miserably overcooked it. It is a simple main dish, but requires a good meat thermometer and some steady attention to pull the roast from the oven at the right time. This time, I succeeded in producing a perfect medium rare prime that could be cut with a fork. Prime time was on my plate.
Christmas Dinner Menu
SALADS
Green Salad With Pomegranate and Mandarin
dressed with Balsamic Vinaigrette
Strawberry Applesauce Salad
Green Salad With Pomegranate and Mandarin
dressed with Balsamic Vinaigrette
Strawberry Applesauce Salad
SIDE DISHES
Chiffonade of Brussels Sprouts with Bacon
Spinach Twice Baked Potatoes
Crab Stuffed Potatoes
Dinner Rolls
Chiffonade of Brussels Sprouts with Bacon
Spinach Twice Baked Potatoes
Crab Stuffed Potatoes
Dinner Rolls
MAIN COURSE
Prime Rib Roast
Prime Rib Roast
DESSERTS
Cranberry Cherry Cheesecake
Frozen Peppermint Cheesecake
Cranberry Cherry Cheesecake
Frozen Peppermint Cheesecake
A crisp, fresh salad is a great way to start a meal, and the addition of sweet, but tart fruit with a tangy dressing makes even the most boring lettuce stand up and be noticed.
Green Salad with Pomegranate and Mandarin
2 cups torn iceberg or romaine lettuce
2 green onions, finely chopped
2 celery ribs, sliced
½ cup pomegranate seeds
½ cup mandarin orange sections
½ cup balsamic vinaigrette (recipe follows)
2 green onions, finely chopped
2 celery ribs, sliced
½ cup pomegranate seeds
½ cup mandarin orange sections
½ cup balsamic vinaigrette (recipe follows)
Mix all greens together in a large salad bowl, adding more lettuce if need be.
Add pomegranate seeds and mandarin orange pieces.
Drizzle with balsamic vinaigrette to taste.
Toss lightly. (Serves 4)
Add pomegranate seeds and mandarin orange pieces.
Drizzle with balsamic vinaigrette to taste.
Toss lightly. (Serves 4)
Balsamic Vinaigrette
½ cup olive oil
¼ cup balsamic vinegar
1 tablespoon lemon juice
1 tablespoon Dijon mustard
1 teaspoon honey
1 clove garlic, minced
salt and pepper
¼ cup balsamic vinegar
1 tablespoon lemon juice
1 tablespoon Dijon mustard
1 teaspoon honey
1 clove garlic, minced
salt and pepper
Whisk all ingredients together and refrigerate until needed.
Re-shake in container or stir before serving. (Yields 3/4 cup dressing)
Strawberry Applesauce Salad is another bright burst of flavor in what could otherwise be considered a very heavy meal. While I know that jello salads make some people roll their eyes, I like this fruity combination and often add it to my holiday table for a punch of color and its tangy flavors.
Strawberry Applesauce Salad
1 (3 ounce) package Strawberry Jell-O
1 cup boiling water
1 (10 ounce package) frozen strawberries, slightly thawed
1 cup applesauce
1 cup boiling water
1 (10 ounce package) frozen strawberries, slightly thawed
1 cup applesauce
Dissolve gelatin in boiling water.
Add frozen strawberries (may slice strawberries, if large-sized).
Stir until berries are thawed.
Add applesauce and mix well.
Pour into serving bowl and chill. (Serves 12)
Add frozen strawberries (may slice strawberries, if large-sized).
Stir until berries are thawed.
Add applesauce and mix well.
Pour into serving bowl and chill. (Serves 12)
A salad isn't enough green on my plate to make me happy. Although, sauteing brussels sprouts in bacon fat probably cancels out any of the healthy green aspects of Chiffonade of Brussels Sprouts with Bacon. Originally, I prepared this dish by hand shredding each individual little brussels sprout with a box grater. For just Hubby and I, this was OK, but I would never consider it for a larger meal with guests. Thankfully, last year's Christmas gift, a Cuisinart food processor, works magic with just a pulse of the button.
Chiffonade of Brussels Sprouts with Bacon
2 pounds Brussels sprouts
5 slices bacon, finely diced
1 teaspoon kosher salt
½ teaspoon fresh ground black pepper
5 slices bacon, finely diced
1 teaspoon kosher salt
½ teaspoon fresh ground black pepper
Trim the stem end of the sprouts and remove any yellow or spotted out leaves.
Shred the sprouts with the coarse shredding attachment of your food processor.
Set aside until about 10 minutes before service.
Cook the bacon over medium-high heat until crisp.
Remove with a slotted spoon to a paper towel to drain.
Set aside.
Reserve the bacon fat in the pan.
Just before serving, reheat the bacon fat in the pan until hot and add the sprouts to the pan.
Saute until crisp-tender and bright green, about 3-5 minutes...if the bacon does not have sufficient fat, you may add some chicken broth at this time.
Add the bacon, salt and pepper, and toss to combine.
Taste, adjust seasonings and serve. (Serves 8)
Twice baked potatoes are an excellent make-ahead side for serving with a Prime Rib dinner. The combinations of ingredients available are endless, and prep really is easy. I chose both Spinach Twice Baked Potatoes and Crab Stuffed Potatoes to add options for my dinner guests. While the "green stuff" in the spinach potatoes might worry some, the flavors are mild with the spinach adding more texture and color than flavor distinction. At our Christmas Dinner, the crab stuffed potatoes were the testers' favorites. I use surimi (imitation crab) in the potatoes because I like the bit of sweetness that it offers.
Spinach Twice Baked Potatoes
4 large baking potatoes, scrubbed well
1 package frozen chopped spinach, thawed
¼ cup butter
¼ cup sour cream
½ cup warm milk, approximately
2 cups grated cheddar cheese
salt and pepper
1 pinch cayenne
1 package frozen chopped spinach, thawed
¼ cup butter
¼ cup sour cream
½ cup warm milk, approximately
2 cups grated cheddar cheese
salt and pepper
1 pinch cayenne
Cut a small slit on top of each potato, and place in a 400 degree oven for 1 hour or until completely done.
Cut each potato in half, lengthwise, and scoop out into large bowl.
Place the potato shells on a baking sheet.
Squeeze the spinach to get all the water out of it, and until it is fairly dry.
Set aside.
Mash the potatoes in the bowl with the butter, sour cream and milk, salt, pepper and cayenne.
Fold in the spinach and 1/2 the cheddar cheese.
Fill potato shells with this mixture.
Top with remaining cheddar cheese.
These potatoes can be made in advance and kept in the refrigerator for a day prior to baking.
Bake at 350 for about 30 minutes or until heated through and the cheese on top has melted and browned a little. (Serves 6-8)
Crab Stuffed Baked Potatoes
4 large baking potatoes, scrubbed well
¼ cup butter
¼-1/3 cup half-and-half cream
salt and pepper
1 cup shredded cheddar cheese
¼ cup finely chopped green onions
1 package imitation crabmeat, chopped
¼ cup butter
¼-1/3 cup half-and-half cream
salt and pepper
1 cup shredded cheddar cheese
¼ cup finely chopped green onions
1 package imitation crabmeat, chopped
Bake potatoes at 425 degrees for 45-50 minutes, or until tender.
When cool enough to handle, halve the potatoes lengthwise.
Carefully scoop out pulp into a bowl, leaving a thin shell.
Set shells aside.
Beat or mash potatoes with butter, cream, salt and pepper until smooth.
Using a fork, stir in cheese and onions.
Gently mix in crab.
Stuff shells.
Return to oven for 15 minutes or until heated through. (Serves 6-8)
Living in the middle of cattle country, Prime Rib is the featured weekend special at many area restaurants. I have experienced good prime and bad prime, and felt for a long time that it was a complicated meal not to be reproduced in the home kitchen. I was wrong. As long as one keeps an eye on the meat thermometer, and doesn't second guess themselves about the temps that are reported as Rare, Medium Rare, etc. in the Joy of Cooking (spoken from experience after a very overly cooked prime time), preparing tender, juicy prime rib at home for a family feast is an easy feat. Horseradish sauce is a must for those that like a little sinus clearing kick.
Prime Rib Roast
prime rib roast (at least 4 pounds)
salt and pepper
4 cloves garlic, minced
salt and pepper
4 cloves garlic, minced
Combine salt, pepper and minced garlic in a small bowl.
Rub the roast liberally with the mixture and place fat side up in an open roasting pan.
Sear in a very hot over (450-475 degrees) for 30 minutes, reduce heat to 300 degrees and cook as follows:
Rare – 18-20 minutes per pound – 120 to 130 degrees
Medium – 25 minutes per pound – 140 to 150 degrees
Well – 30 minutes per pound – 170 to 185 degrees
Allow to rest out of the oven for 15 to 30 minutes before carving.
Of course, a holiday meal must end with dessert. I had a slight disaster when preparing for my Christmas Dinner. On Christmas Eve day, I began preparations for both a Pumpkin Ginger baked Cheesecake and a Cranberry Lemon Swirled baked Cheesecake. However, it wasn't meant to be. I only used one layer of foil to wrap the spring form pan of the pumpkin ginger cheesecake, and the water bath seeped in and logged the cheesecake. The canned cranberry sauce that I chose for the lemon swirled cheesecake didn't have a deep red color and when swirled with the lemony cream cheese mixture became muddy and inedible looking, instead of the pretty pink that I had envisioned. Those labor and ingredient intensive desserts were soon sent to the trash.
Instead, I shuffled through my to-try list of recipes and found two simple no bake cheese cakes to fill us with one last sweet bite before we left the holiday table. Unfortunately, my bad dessert luck followed me and the Cranberry Cherry Cheesecake didn't set up properly. I served it, but was embarrassed as it slopped onto plates instead of forming perfect wedges of cream cheese goodness. I plan to tweak that recipe to yet find success. It had a great flavor, but presentation was sadly lacking.
Frozen Peppermint Cheesecake makes enough to fill two premade chocolate cookie crusts. It is the perfect light and minty ending to a heavy prime rib meal, and the crushed peppermint candy canes on top are in tune with the holiday season. It was a breath of fresh air to finish Christmas Dinner on my plate.
Frozen Peppermint Cheesecake
8 ounces cream cheese, softened
1 can sweetened condensed milk
1 cup hard peppermint candies, crushed (like candy canes)
3 drops red food coloring
2 cups heavy cream, whipped
2 prepared chocolate cookie crumb crusts
Using an electric mixer on high speed, beat cream cheese until smooth and fluffy.1 can sweetened condensed milk
1 cup hard peppermint candies, crushed (like candy canes)
3 drops red food coloring
2 cups heavy cream, whipped
2 prepared chocolate cookie crumb crusts
Add condensed milk, crushed mint candy, and the food coloring.
Mix on low to combine, then on high to beat together well.
With a spatula, fold in whipped cream and pour into the crusts.
Cover and freeze until firm.
Garnish with additional whipped cream and whole pieces of peppermint candy, if desired.
Labels:
beef,
brussels sprouts,
cheesecake,
Christmas,
holiday,
menu help,
party,
pomegranate,
potatoes,
prime rib,
salad,
vegetables
Monday, January 08, 2007
'Twas the Night Before Christmas

I hosted my parents and younger sister for Christmas Eve dinner. We had a casual, but hearty dinner followed by our family gift exchange. My usual plan for our Christmas Eve meal is to serve soup, sandwiches, and Christmas cookies, but this year, I shook things up a bit while still keeping it relaxed.
Christmas Eve Dinner
SALAD
Seven Layer Salad
SIDE DISHES
Green Beans with Almonds
Scalloped Potatoes and Onions
Dinner Rolls
MAIN COURSE
Baked Spiral-Cut Ham
with Simple Glaze
DESSERTS
Pecan Pie
Triple Berry Pie
Seven-Layer Salads have been around since before I was born. They are potluck staples and overall classics for their ease of preparation and great presentation. Recipes vary, and I have previously shared with you a Cooking Light version that omits the frozen peas in favor of kidney beans, but for Christmas Eve, I wanted the crisp, green sweetness of the peas. A cut glass bowl makes the most of the visual appeal of this salad.
Classic Seven Layer Salad
1 head iceberg lettuce, cored and cut into pieces
1 cucumber, seeded and sliced
1 cup frozen peas, rinsed and drained
1 ½ cups thinly sliced celery
1 red onion, thinly sliced
6 ounces sharp cheddar cheese, shredded
½ pound bacon, cooked until crisp and crumbled
2 cups mayonnaise
2 tablespoons sugar
½ cup sour cream
1 tablespoon Lawry's Seasoned Salt
Layer first 5 ingredients one at a time (do not mix) into a large glass bowl so you can see each layer.
Mix all mayo, sugar, sour cream, and seasoned salt together and pour evenly over salad.
Finish with a layer of cheese then the final layer of bacon.
Green Beans with Almonds starts by steaming fresh green beans and sauting sliced almonds in a little butter. Lemon juice brightens the flavors of the entire dish just before serving. I love the crispness of fresh green beans. Yum!
Green Beans with Almonds
½ pound fresh green beans
1 tablespoon butter
2 tablespoons sliced almonds
2 teaspoons olive oil
1 teaspoon lemon juice
salt and pepper, to taste
1 tablespoon butter
2 tablespoons sliced almonds
2 teaspoons olive oil
1 teaspoon lemon juice
salt and pepper, to taste
Steam beans for 3 to 5 minutes, or until tender-crisp.
In a small skillet, melt butter and add almonds on medium heat until toasty. Remove from heat.
Mix olive oil and lemon juice together in a medium-large bowl.
Toss drained beans with olive oil mixture. Top with toasted almonds.
Salt and pepper to taste.
In a small skillet, melt butter and add almonds on medium heat until toasty. Remove from heat.
Mix olive oil and lemon juice together in a medium-large bowl.
Toss drained beans with olive oil mixture. Top with toasted almonds.
Salt and pepper to taste.
Scalloped Potatoes and Onions was a new dish that will definitly be repeated in our home. A creamy sauce is poured over layers of thinly sliced potatoes and onions and baked. How easy is that? This version omits any cheese and uses mayonnaise for a flavor boost. I admit that the ingredients did worry me a bit, but the end result was a fabulous potato dish that did not disappoint us on our holiday table.
Scalloped Potatoes and Onions
5 large potatoes, pared and thinly sliced
½ cup chopped onions
3 tablespoons butter
¼ cup flour
¾ teaspoon salt
1 (14 ounce) can chicken broth
¼ cup mayonnaise
1/8 teaspoon pepper
paprika
½ cup chopped onions
3 tablespoons butter
¼ cup flour
¾ teaspoon salt
1 (14 ounce) can chicken broth
¼ cup mayonnaise
1/8 teaspoon pepper
paprika
In a 1 1/2 quart greased casserole, layer potatoes and onions.
In a medium saucepan, melt butter; stir in flour and whisk until smooth and frothy.
Gradually add the broth, mayonnaise, salt and pepper. Stir until this mixture thickens.
Pour over potatoes and onions. Sprinkle generously with paprika.
Bake in a preheated 350 oven for 1 hour or until potatoes are tender.
Our ham was basted with a Simple Ham Glaze of corn syrup, brown sugar, brown grainy mustard, and spices. I had chosen a spiral cut ham that baked beautifully with the glaze and was tender and juicy.
Simple Ham Glaze
1 cup light corn syrup
½ cup firmly packed brown sugar
3 tablespoons brown grainy mustard
½ teaspoon ground ginger
1 dash ground cloves
½ cup firmly packed brown sugar
3 tablespoons brown grainy mustard
½ teaspoon ground ginger
1 dash ground cloves
In 2-quart saucepan combine all ingredients.
Stirring constantly, bring to boil over medium heat and boil 5 minutes.
Brush frequently on ham during last 1/2 hour of baking.
Our pies were *shock* frozen, premade versions from Schwan's. I had picked them up to have on hand as quick sweet treats for Hubby and I, but decided that it was time to clear them from the freezer. I don't mind making pies, and I know that it may seem a disgrace to serve frozen pies at a holiday, but in reality, my family didn't mind. I had one less thing to fuss over, and it made the prep for the evening much easier. Rachel Ray often says to take the help where you can get it. I don't know that I will again serve frozen pies for a holiday meal, but I certainly won't worry if I do. I may not have millions and billions of homes to visit with a sleigh full of toys, but I always seem to have plenty of good things on my plate for Christmas Eve...even when I don't prepare my own pies.
Labels:
Christmas,
comfort food,
food,
green beans,
ham,
holiday,
menu help,
party,
pork,
potatoes,
salad,
vegetables
Saturday, December 02, 2006
Feng Shui?
Hubby and I often join another couple to play a card game called Hand and Foot. The guys pair off against the women and usually win. The only explanation that I have for their constant good luck is that the guys seem to be pushing bad Feng Shui onto us. We (the women) are usually forced to sit with our backs to the doors while playing out our hands at the kitchen table. I haven't done an in depth study of Feng Shui, but isn't this considered a no-no? Doesn't this allow the bad vibes to sneak up on us? The one time that the guys switched places with us and sat with their backs to the doors, they lost. This has to be proof, right? ;~) The guys don't believe us. They just revel in their wins and gloat.
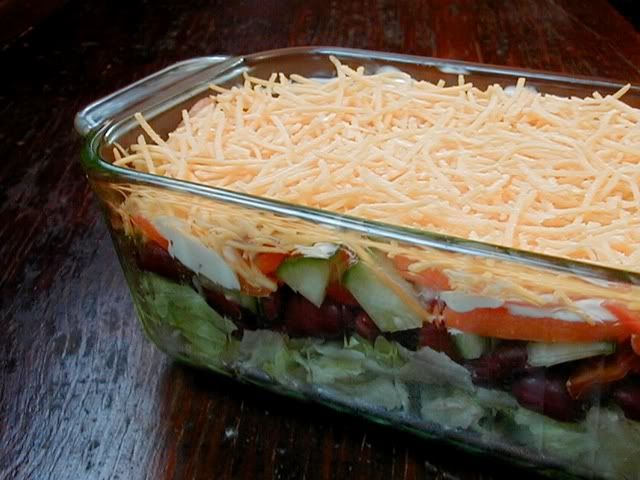
Tonight, our game was no different. Following a meal of take-out pizza and cake to celebrate our friends' daughter's birthday, the women again lost miserably in the card game. :~( We did attempt to achieve balance and harmony with the meal, though. I prepared a Seven-Layer Salad to balance with the pizzas. In harmony with the likes and dislikes of the children of the house, I omitted the onions and peas that are usual standards for layered salads. I searched out another Cooking Light recipe that included kidney beans instead of the peas and added prepared Ranch dressing to the topping instead of the normal sugary mayonnaise mixture. No bad vibes could sneak up on this salad, but I wish that it would have attracted better luck for my cards.
Layer lettuce, beans, tomatoes, cucumbers, and carrots in that order in a large bowl.
Combine sour cream and ranch dressing.
Spread dressing mixture over carrot layer.
Top with shredded cheddar cheese.
Cover and chill. (Serves 6)

Cooking Light's Seven-Layer Salad
6 cups iceberg lettuce, torn
1 (15 ounce) can kidney beans, rinsed and drained
2 cups tomatoes, diced
1 cup cucumbers, diced
1 cup carrots, shredded
½ cup nonfat sour cream
½ cup low-fat Ranch dressing
½ cup reduced-fat sharp cheddar cheese, shredded
1 (15 ounce) can kidney beans, rinsed and drained
2 cups tomatoes, diced
1 cup cucumbers, diced
1 cup carrots, shredded
½ cup nonfat sour cream
½ cup low-fat Ranch dressing
½ cup reduced-fat sharp cheddar cheese, shredded
Layer lettuce, beans, tomatoes, cucumbers, and carrots in that order in a large bowl.
Combine sour cream and ranch dressing.
Spread dressing mixture over carrot layer.
Top with shredded cheddar cheese.
Cover and chill. (Serves 6)
Friday, November 24, 2006
My Hubby, The Green Gobbler
I had planned to put together my full Thanksgiving menu along with hints, tips, and whatever else popped into my mind as I typed. However, between an out of control painting project that dominated my time until the morning of Thanksgiving, the actual preparations and cooking, and a tempermental computer system, I haven't accomplished that. I think it is time to let go of those good intentions. It just isn't going to happen.
Instead, I find myself coming back to green. I seem to have an obsession, huh? I have said before that I try to include a lot of green vegetables in our diet. Hubby likes to give me a hard time about this sometimes. He likes his veggies, but wouldn't complain if I just served him the steak without a salad. Thanksgiving was no exception. I wanted to include a Pureed Broccoli dish on our Thanksgiving table. In spite of Hubby's dislike of mashed foods, the leeks and bit of potato in this do appeal to him. He would prefer his broccoli be served with a cheese sauce, but he usually doesn't give me a lot of grief over this pureed sidedish.
After a very short night (up until 5:30am to finish painting project and cleaning and awake at 7:30am to get the turkey ready and bake the pies), I was very happy that things were going smoothly, and everything was ready when our guests arrived at 1pm. The turkey was moist and roasted to perfection; the mashed potatoes were creamy; the gravy was lump-free; all of the sidedishes came together without a hitch, and the pie crusts were flaky (thank heavens for Pillsbury). My mother had brought a ham for my anti-poultry father, and the table was sagging under the load of our Thanksgiving feast.
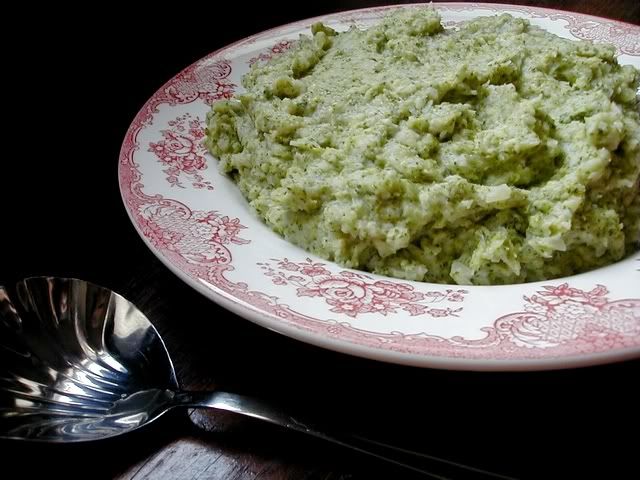
As we were passing the dishes around the table, Hubby nudged me and pointed to the scoops of both pureed broccoli and peas in butter sauce that he had just served himself. "There is too much green on my plate," he announced. His next act was to gobble up the Pureed Broccoli to make room on his plate for more dressing (or do you call it stuffing?). I had to laugh because I did notice when he had seconds of the broccoli a little later. :~)
Melt butter in a large skillet over medium heat.
Stir in leeks.
Cover and stir often until leeks are very soft (about 15 minutes).
Cook potato in salted water until almost done (about 15 minutes).
To potato and water, add broccoli stems (5 minutes) and then florets (5 minutes) or until tender.
Drain well and transfer to food processor.
Add leeks to the food processor and puree all.
Return puree to skillet and add cream, dill, salt and pepper.
Blend well and serve.
Instead, I find myself coming back to green. I seem to have an obsession, huh? I have said before that I try to include a lot of green vegetables in our diet. Hubby likes to give me a hard time about this sometimes. He likes his veggies, but wouldn't complain if I just served him the steak without a salad. Thanksgiving was no exception. I wanted to include a Pureed Broccoli dish on our Thanksgiving table. In spite of Hubby's dislike of mashed foods, the leeks and bit of potato in this do appeal to him. He would prefer his broccoli be served with a cheese sauce, but he usually doesn't give me a lot of grief over this pureed sidedish.
After a very short night (up until 5:30am to finish painting project and cleaning and awake at 7:30am to get the turkey ready and bake the pies), I was very happy that things were going smoothly, and everything was ready when our guests arrived at 1pm. The turkey was moist and roasted to perfection; the mashed potatoes were creamy; the gravy was lump-free; all of the sidedishes came together without a hitch, and the pie crusts were flaky (thank heavens for Pillsbury). My mother had brought a ham for my anti-poultry father, and the table was sagging under the load of our Thanksgiving feast.

Pureed Broccoli
4 ½ tablespoons butter
5 cups halved and thinly sliced leeks, white and pale green parts only
2 large russet potatoes, peeled and quartered
1 pound broccoli, separated into florets and stems (peel the woody skin from the stems)
6 tablespoons whipping cream
1 tablespoon fresh dill
5 cups halved and thinly sliced leeks, white and pale green parts only
2 large russet potatoes, peeled and quartered
1 pound broccoli, separated into florets and stems (peel the woody skin from the stems)
6 tablespoons whipping cream
1 tablespoon fresh dill
Melt butter in a large skillet over medium heat.
Stir in leeks.
Cover and stir often until leeks are very soft (about 15 minutes).
Cook potato in salted water until almost done (about 15 minutes).
To potato and water, add broccoli stems (5 minutes) and then florets (5 minutes) or until tender.
Drain well and transfer to food processor.
Add leeks to the food processor and puree all.
Return puree to skillet and add cream, dill, salt and pepper.
Blend well and serve.
Monday, November 20, 2006
Redo
I started painting in my pantry. I knew that I didn't have time to paint the new colors over the entire kitchen before Thanksgiving, but I wanted to give the pantry a peek of the new life to come. I emptied the contents of the all of the cupboards (old houses mean painting inside and out for those storage places), patched a couple of cracks in the plaster, and wiped everything down. I was ready. A first coat of paint inside one cupboard was looking good. I was charged.
Painting isn't one of my favorite things. I don't have the attention span. I get bored, my hand cramps around the paint brush or roller, and my shoulder starts to ache from holding my arm above my head. But, the fresh appearance of the new paint kept me moving...until I hit the walls. The shade that I had chosen for the walls seemed very yellow and garish. It wasn't the calm, soothing shade that I had hoped for. I continued painting with the hopes that the dry paint would reflect the light differently. No luck. I didn't like it. It wasn't what I had in mind.
I am going to finish the pantry before Thanksgiving, leaving the overly bright walls intact. There just isn't enough time to repaint them, finish the cupboards, and replace everything that is currently piled in overflowing boxes in the rest of the kitchen and dining room. The walls are absolutely on my list to redo once the turkey is carved.
I am planning dinner with a redo in mind, too. Hubby is out of town again today and won't return until late. I am on my own, but planning a meal that can be reheated later in the week when I am not. Leftovers aren't usually winners in this house, but some things do seem to just be better the second time around. Asparagus and Leek Tart falls into that category. The flavors of the Swiss cheese and veggies really come into their own the day after baking. Tonight, I will have a slice as I contemplate new kitchen wall colors. Later, I will redo without a worry.
Painting isn't one of my favorite things. I don't have the attention span. I get bored, my hand cramps around the paint brush or roller, and my shoulder starts to ache from holding my arm above my head. But, the fresh appearance of the new paint kept me moving...until I hit the walls. The shade that I had chosen for the walls seemed very yellow and garish. It wasn't the calm, soothing shade that I had hoped for. I continued painting with the hopes that the dry paint would reflect the light differently. No luck. I didn't like it. It wasn't what I had in mind.
I am going to finish the pantry before Thanksgiving, leaving the overly bright walls intact. There just isn't enough time to repaint them, finish the cupboards, and replace everything that is currently piled in overflowing boxes in the rest of the kitchen and dining room. The walls are absolutely on my list to redo once the turkey is carved.

Asparagus and Leek Tart
2 cups asparagus, cut into 1 inch segments
2 tablespoons butter
1 ½ cups leeks, cleaned and sliced, white part only
2 cups Swiss cheese, grated
2/3 cups parmesan cheese, grated
12 inch tart crust, pre-baked and cooled
2 teaspoons fresh parsley, chopped
½ teaspoon fresh thyme, chopped
½ teaspoon fresh marjoram, chopped
2 eggs
2 egg yolks
2 cups cream
1 ½ teaspoons salt
½ teaspoon fresh ground black pepper
Preheat the oven to 400°F.
Bring a pot of water to the boil and blanch the asparagus a few minutes until just barely cooked.
Drain and immediately plunge the asparagus in a bowl of ice water.
Drain again and set aside.
Melt the butter in a saute pan or skillet over medium heat and add the leeks.
Saute a few minutes then cover and turn the heat to low and slowly cook leeks until soft, stirring occasionally, about 15 to 20 minutes.
Set aside to cool.
Sprinkle half the Swiss and half the parmesan cheeses over the bottom of the prebaked tart shell.
Evenly spread the leeks and asparagus in the shell.
Sprinkle the vegetables with the herbs and the rest of the Swiss and parmesan.
In a bowl, using a whisk, beat the eggs, yolks, cream, salt and pepper.
Pour the custard over the filling ingredients.
(Tip: it's easier to fill the tart without spilling over the edge if you put half the custard in a Pyrex measuring cup and pour it into the tart when the tart is already in the oven.) Place the tart on a baking sheet and bake for 35 to 40 minutes or until puffed and golden and the custard is set.
(You can check by inserting the tip of a small knife into the center of the tart. It should be soft but not runny.) Remove the tart from the oven, slice into wedges, and serve warm.
Subscribe to:
Posts (Atom)